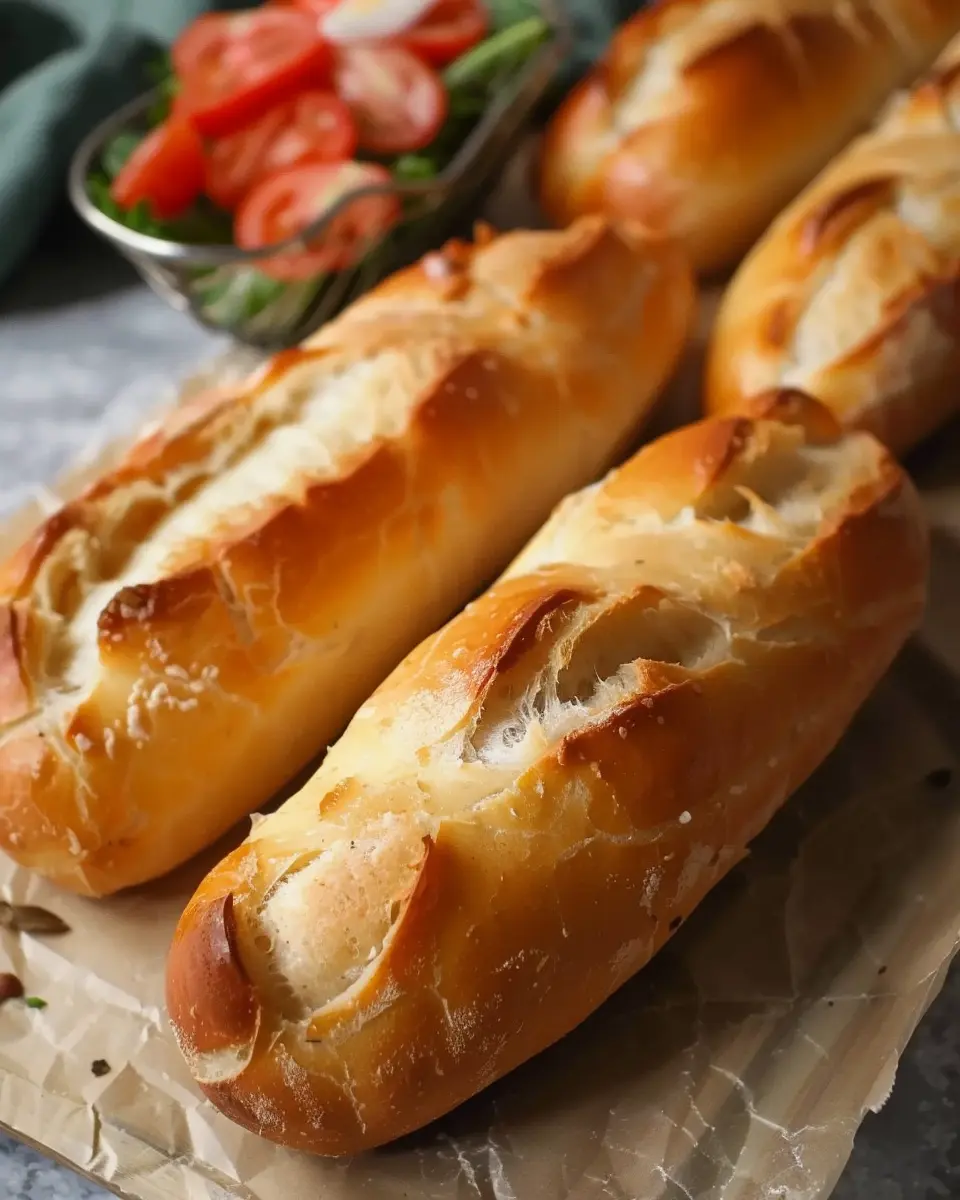
Introduction to Handmade Sub Rolls
If you’ve ever bitten into a soft, fresh sub roll, you’ll know there’s nothing quite like it. While store-bought versions have their convenience, handmade sub rolls bring a special touch to your meals that simply can’t be replicated. So, why should you consider making these delicious rolls from scratch? Let’s dive in!
Why Handmade Sub Rolls are Worth It
The beauty of crafting your own handmade sub rolls lies in the control you gain over the ingredients. Store-bought alternatives often contain preservatives and additives that can detract from the taste and health benefits. By making your own, you ensure that every bite is packed with freshness and flavor.
Here are some of the perks of opting for handmade sub rolls:
-
Quality Ingredients: You select only the best flour, yeast, and toppings to guarantee flavor and nutrition. For instance, using whole wheat flour not only enhances taste but also adds fiber.
-
Customization: Whether you’re filling your sub with savory turkey bacon, zesty chicken ham, or a medley of fresh vegetables, homemade rolls are tailored exactly to your palate.
-
Connection to Your Food: The process of kneading dough and watching it rise can feel surprisingly rewarding. It’s a way to connect with your meal, turning cooking into a delightful experience rather than a chore.
Experts in the culinary world emphasize the importance of using high-quality ingredients for greater satisfaction. According to culinary professionals at Serious Eats, a good roll is the foundation of any great sandwich. With your handmade sub rolls, you can achieve that perfect texture, achieving a golden crust with a soft, airy inside.
Perfect for Any Occasion
What’s more, handmade sub rolls are versatile; they work for everything from casual picnics to elegant dinner parties. Imagine serving them warm, right out of the oven, filled with your favorite vacation-inspired ingredients or deli-style meats. They’re not just rolls—they’re a blank canvas for your culinary creativity.
Ready to roll up your sleeves and get started? Your tastebuds are about to thank you!

Ingredients for Handmade Sub Rolls
Essential Ingredients for Delicious Sub Rolls
When it comes to crafting the perfect handmade sub rolls, the right ingredients can make all the difference. Here’s what you’ll need:
- All-Purpose Flour: This is your base. Look for a good quality flour that offers the right balance of protein for a chewy texture.
- Water: Simple yet essential! Warm water helps activate the yeast for fluffiness.
- Yeast: Either active dry or instant yeast will work wonders in making your rolls rise beautifully.
- Salt: Enhances flavor and strengthens the dough.
- Olive Oil: Introduces a lovely richness and helps keep your rolls soft.
- Sugar: Just a touch, it’s food for the yeast and adds a hint of sweetness.
By using these straightforward ingredients, you’ll be on your way to creating irresistibly soft and flavorful handmade sub rolls that can elevate any sandwich! For tips on how to pick the best flour, check out this guide. Remember, quality ingredients lead to quality outcomes! Wouldn’t you agree?
Preparing Handmade Sub Rolls
Creating handmade sub rolls from scratch is a delightful experience that opens the door to a world of culinary creativity. Trust me, there’s something incredibly satisfying about kneading dough with your own hands and watching it rise into fluffy, golden rolls. Ready to roll up your sleeves? Let’s dive into the steps!
Bloom the yeast
The first important step in making these delicious rolls is to bloom the yeast. This helps activate it, ensuring our rolls turn out light and airy. Here’s how to do it:
- In a small bowl, combine about 1 packet (2 ¼ teaspoons) of active dry yeast with a teaspoon of sugar and a half-cup of warm water (about 110°F).
- Let it sit for about 5-10 minutes until it becomes frothy. This is a great time to make sure you’re using fresh yeast; if it doesn’t foam, it might be time to get a new batch!
Blooming your yeast is a crucial step that can greatly affect the texture of your handmade sub rolls. If you’ve ever wondered why your bread isn’t rising, this is often the culprit.
Combine flour and salt
Now that your yeast is all frothy and ready to go, it’s time to blend the dry ingredients. In a large mixing bowl, combine:
- 4 cups of all-purpose flour
- 1 tablespoon of salt
This balance of flour and salt is essential for flavor. Stir these dry ingredients together; using a whisk can help you get an even mix.
If you’re experimenting with different types of flour, consider checking out King Arthur Baking for insights on blending flours. They offer some fantastic tips on using whole wheat or gluten-free options if you want to shake things up!
Knead the dough
With your ingredients combined, it’s time to knead the dough. This process develops the gluten, which gives your rolls structure.
- Pour the bloomed yeast mixture into the flour and salt mixture.
- Mix until a dough forms and then transfer it onto a floured surface.
Now to get your arms working! Knead the dough for about 8-10 minutes. You want it to be smooth and elastic. If you’re new to kneading, don’t hesitate to check out videos online—watching someone else can really help!
Let the dough rise
Once you’ve kneaded your dough to perfection, it’s time to let it rise. This step is vital for achieving that delightful fluffiness.
- Place your dough in a lightly greased bowl, cover it with a clean kitchen towel, and let it sit in a warm environment for about 1 to 2 hours. The dough should double in size.
Patience is key here! If you need tips on finding the perfect rising spot, consider placing it in your oven (turned off) or near a sunny window.
Shape the sub rolls
Finally, it’s time to shape your handmade sub rolls!
- After the dough has risen, punch it down gently to release the air.
- Divide the dough into equal portions—about 10 to 12—depending on how big you want your rolls.
- Shape each piece into an elongated roll, tapering the ends slightly, and place them on a baking sheet lined with parchment paper.
Cover the rolls with the kitchen towel again, and let them rise for another 30-60 minutes. Preheat your oven to 375°F during this time, and get ready to bake!
The moment your rolls emerge from the oven, golden and fragrant, you’ll understand why making them from scratch is worth every step.
With a batch of handmade sub rolls, you’re on your way to assembling delicious sandwiches, perfect for any occasion—just imagine them filled with turkey bacon, chicken ham, or your favorite veggies. Enjoy the process, and happy baking!

Variations on Handmade Sub Rolls
Herbed Sub Rolls
For a delightful twist on your classic handmade sub rolls, consider infusing them with fresh herbs. Just imagine taking a bite of a warm sub roll that bursts with flavor. To achieve this, incorporate ingredients like dried oregano, rosemary, or thyme into your dough. Not only do these herbs add a fragrant aroma, but they also provide a savory kick that pairs beautifully with your favorite fillings.
- Recipe Tip: Blend your herbs into the flour before mixing in wet ingredients for an even distribution.
- Fun Fact: Studies suggest that using fresh herbs can enhance the overall nutritional profile of your meals, so why not enjoy the best of both worlds?
Whole Grain Sub Rolls
If you’re looking to make your handmade sub rolls a bit more health-conscious, whole grain flour is your best friend. Whole grain options are packed with fiber and nutrients, giving you a hearty base for your delicious sandwiches. They also boast a nutty flavor and denser texture that complements various fillings like Turkey Bacon or Chicken Ham.
- Nutritional Boost: Whole grains can help lower the risk of heart disease and improve digestion. For more health benefits, check out resources from Harvard Health.
Experimenting with these variations not only enhances the flavor of your rolls but also allows you to cater to different dietary needs or personal preferences. Don’t hesitate to get creative and try your own combinations—there are no limits to making a sandwich with style!
Baking Notes for Handmade Sub Rolls
Crafting the perfect handmade sub rolls is an experience rich with texture and aroma. Here are some tips to elevate your baking skills and ensure your rolls come out fluffy and delicious.
Tips for Achieving the Perfect Texture
-
Knead Thoroughly: Don’t rush this step! Knead the dough for around 10-15 minutes, allowing gluten to develop. This vital process adds structure and chewiness to your rolls.
-
Temperature Matters: When activating yeast, ensure your water is warm but not hot—around 110°F (43°C) is ideal. Higher temperatures can kill the yeast, resulting in flat rolls.
-
Flour Variations: Experiment with a blend of all-purpose flour and bread flour. The latter has a higher protein content, contributing to a chewier texture.
-
Let It Rise: For optimal fluffiness, allow your dough to rise in a warm place until it doubles in size. This can take about an hour, so your patience will pay off!
For some additional techniques, you might find resources like King Arthur Baking helpful. Remember, baking is both a science and an art, so enjoy the process!

Serving Suggestions for Handmade Sub Rolls
When it comes to handmade sub rolls, the possibilities are truly endless! These delectable rolls can elevate any meal, making them perfect for lunches, picnics, or even casual dinner gatherings. Here are some sandwich ideas to help you make the most of your fresh sub rolls:
Creative Sandwich Ideas
-
Turkey Bacon Club: Layer crispy turkey bacon, fresh lettuce, juicy tomatoes, and a creamy ranch dressing. This classic is bound to be a hit!
-
Chicken Ham and Avocado: Combine slices of savory chicken ham with ripe avocado, alfalfa sprouts, and a touch of mustard for a refreshing twist on the traditional sub.
-
Beef and Veggie Deluxe: Fill your sub with thinly sliced roast beef, sautéed peppers, mushrooms, and onions, topped with melted cheese for an indulgent treat.
-
Mediterranean Delight: Load your roll with hummus, grilled veggies, feta cheese, and spinach for a healthy and flavorful option.
Making it Your Own
Feel free to experiment with different ingredients or sauces that suit your taste. Learn more about fresh ingredient combinations from sources like EatingWell or Bon Appétit. Each sub roll becomes a canvas for your culinary creativity, ensuring every bite is as delightful as the last!
Tips for Making Perfect Handmade Sub Rolls
Creating the perfect handmade sub rolls may seem daunting, but with a little guidance, you’ll soon be the go-to sandwich maker in your friend group. Here are some tips to keep your baking on point.
Common Pitfalls to Avoid
-
Overworking the Dough: It’s easy to get carried away kneading the dough, but too much gluten development can lead to dense rolls. Aim for a soft, slightly sticky dough that springs back gently when pressed.
-
Incorrect Yeast Temperature: Make sure your water is not too hot or too cold when activating the yeast. The ideal temperature should be between 100°F and 110°F to ensure your rolls rise beautifully.
-
Ignoring Rise Time: Patience is key! Skipping the second rise can leave your handmade sub rolls flat. Give them enough time to puff up to their full potential; about 30-60 minutes is usually perfect.
-
Not Using Proper Flour: Opt for bread flour over all-purpose flour for a chewier texture. Bread flour has a higher protein content, which helps create those perfect gluten strands.
-
Skipping the Steam: If you’re looking for crusty rolls, spritz the rolls with water before baking. This added steam helps achieve that desirable crusty exterior (learn more about steam baking techniques here).
With these tips in mind, you’re all set to make scrumptious handmade sub rolls that will elevate any sandwich to a whole new level! Happy baking!
Time details for Handmade Sub Rolls
Preparation time
Getting started is a breeze! For your handmade sub rolls, set aside about 15-20 minutes to gather your ingredients, mix your dough, and shape your rolls.
Proofing time
Patience is key here. Let your dough rise for about 1-2 hours, or until it doubles in size. This is when the magic of fermentation happens!
Baking time
Once your rolls have proofed beautifully, bake them for about 20 minutes at 375°F (190°C) until they’re golden brown and delightful.
Total time
In total, you’re looking at approximately 2-3 hours from start to finish, including preparation, proofing, and baking. But trust me, the aroma and taste of these fresh handmade sub rolls are well worth the wait!
For more detailed insights on bread-making techniques, check out Bakerpedia. Enjoy your baking adventure!
Nutritional Information for Handmade Sub Rolls
When you’re whipping up a batch of handmade sub rolls, it’s always helpful to know what you’re putting on the plate. Here’s a quick snapshot of the nutritional benefits these delicious rolls bring to your meals.
Calories
Each serving of our handmade sub rolls contains approximately 150 calories. That makes them a great base for your favorite fillings without breaking the calorie bank.
Protein
You’ll find about 5 grams of protein in each roll, helping to keep you feeling full and satisfied. Protein is essential for muscle repair and overall health.
Carbohydrates
With about 28 grams of carbohydrates, these rolls provide energy to fuel your day. They’re a perfect choice for a hearty lunch or dinner, especially when loaded with nutritious toppings.
For more detailed information, check out the USDA FoodData Central for insights on bread and carbohydrate contents. If you’re curious about balanced meal ideas, the American Heart Association offers great resources on healthy eating.
FAQs about Handmade Sub Rolls
Can I freeze handmade sub rolls?
Absolutely! Handmade sub rolls freeze beautifully, making them perfect for meal prep. To freeze, allow your rolls to cool completely, then wrap each one in plastic wrap or aluminum foil. Place wrapped rolls in a sealable freezer bag to prevent freezer burn. They can stay fresh in the freezer for up to three months. When you’re ready to enjoy, just take them out and let them thaw at room temperature or pop them in the oven at a low temperature to warm them up.
How do I store leftover sub rolls?
Leftover handmade sub rolls can easily lose their delightful texture if not stored properly. Keep them in an airtight container at room temperature for up to two days. For longer storage, you can refrigerate them, but be mindful that refrigeration can toughen the texture. If you’re okay with that, they’ll last about a week. Reheating them in the oven for a few minutes can bring back some of their original charm!
What fillings pair well with sub rolls?
The beauty of handmade sub rolls lies in their versatility. Here are some delicious filling ideas to get the creativity flowing:
- Turkey Bacon & Fresh Avocado: A savory classic with a creamy twist.
- Chicken Ham & Cheese: A delightful combination that’s comforting and satisfying.
- Grilled Veggies & Hummus: A fresh, vegetarian option full of flavor.
- Beef and Barbecue Sauce: Perfect for a hearty lunch or dinner.
- Tuna Salad & Lettuce: A refreshing pick with a protein punch.
Feeling adventurous? Try mixing and matching flavors to find your perfect combination. For more ideas on fillings, check out The Kitchn’s Guide to explore innovative recipes that will elevate your sandwich game!
Conclusion on Handmade Sub Rolls
Embracing homemade goodness
As we wrap up our adventure into crafting handmade sub rolls, remember that the beauty of homemade baking lies in the process. Not only do you gain the satisfaction of creating something delicious from scratch, but you also have control over the ingredients. Fresh ingredients mean more flavor and nutrition, making your meals more enjoyable.
Imagine sinking your teeth into a warm, fluffy roll filled with Turkey Bacon or Chicken Ham paired with your favorite toppings—it’s a game changer! Plus, making these rolls can be a great way to unwind after a long day. So why not gather some friends, roll up your sleeves, and dive into this delightful kitchen endeavor? Explore more tips here for a delightful baking experience!
PrintHandmade Sub Rolls: The Best Comfort Food with Turkey Bacon and Chicken Ham

Enjoy the ultimate comfort food with these handmade sub rolls, perfect for sandwiches filled with turkey bacon and chicken ham.
- Prep Time: 20 minutes
- Cook Time: 20 minutes
- Total Time: 1 hour 40 minutes
- Yield: 12 rolls 1x
- Category: Baking
- Method: Baking
- Cuisine: American
- Diet: Omnivore
Ingredients
- 3 cups all-purpose flour
- 1 cup warm water
- 2 tablespoons sugar
- 2 teaspoons salt
- 2 tablespoons olive oil
- 1 packet active dry yeast
- 1 teaspoon garlic powder
- 1 teaspoon onion powder
Instructions
- In a bowl, combine warm water, sugar, and yeast. Let it sit for 5-10 minutes until frothy.
- Add olive oil, salt, garlic powder, and onion powder. Mix well.
- Gradually add flour while kneading the dough until smooth.
- Let the dough rise in a warm place for 1 hour or until doubled in size.
- Preheat the oven to 375°F (190°C).
- Shape the dough into rolls and place them on a baking sheet.
- Allow the rolls to rise for another 30 minutes.
- Bake for 15-20 minutes or until golden brown.
Notes
- These rolls can be frozen for later use.
- Try adding herbs for extra flavor!
Nutrition
- Serving Size: 1 roll
- Calories: 160
- Sugar: 1 gram
- Sodium: 200 mg
- Fat: 4 grams
- Saturated Fat: 0.5 grams
- Unsaturated Fat: 3 grams
- Trans Fat: 0 grams
- Carbohydrates: 30 grams
- Fiber: 1 gram
- Protein: 5 grams
- Cholesterol: 0 mg
Keywords: Handmade Sub Rolls, Comfort Food, Turkey Bacon, Chicken Ham