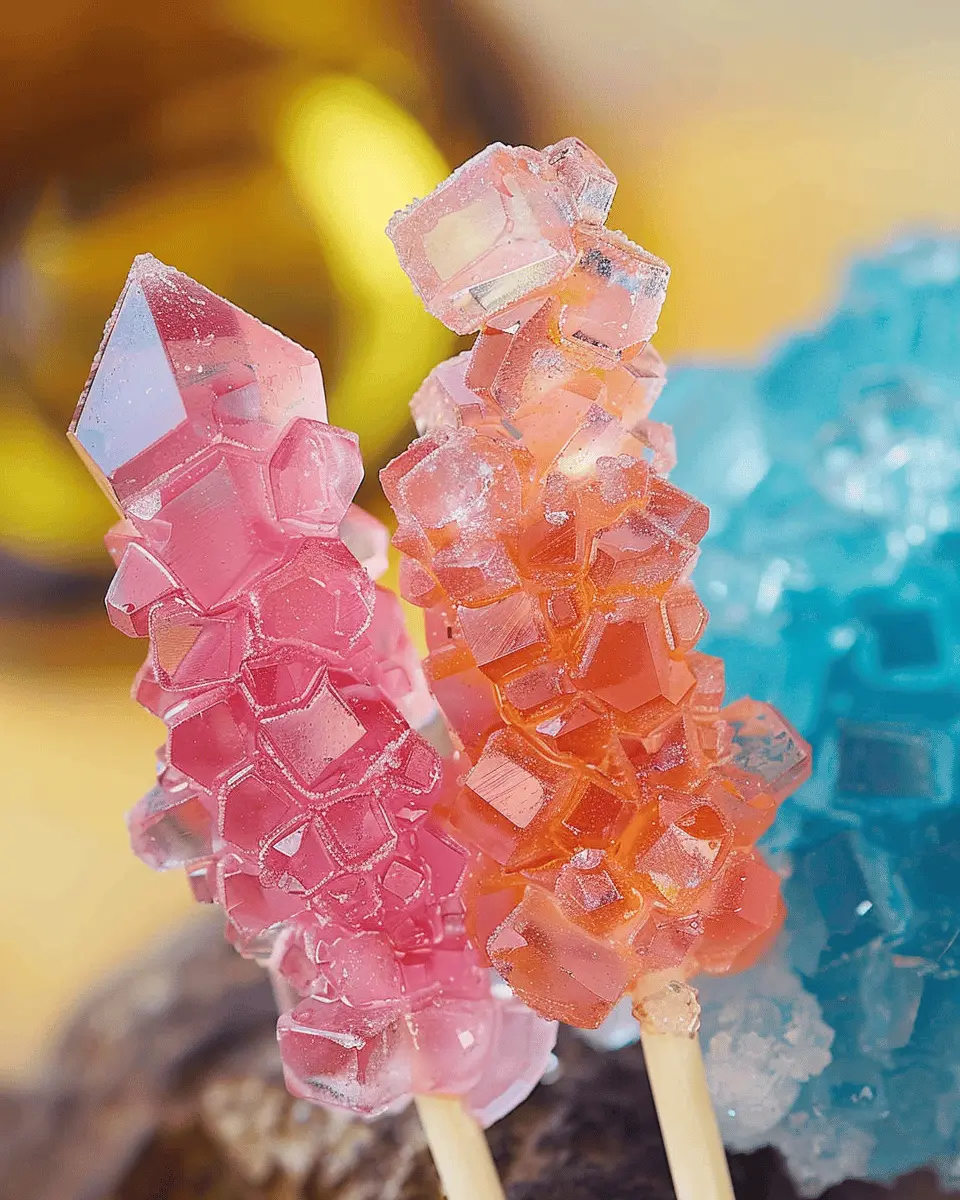
Introduction to Rock Candy
Rock candy is not just a sweet treat; it’s a delightful science project waiting to happen in your kitchen! This crystalline confection is primarily made from sugar and water, offering a visually stunning and tasty reward for your efforts. What’s particularly fascinating is the process involved in making rock candy. As the sugar solution cools and the water evaporates, sugar crystals form, creating those iconic, sparkly chunks of sweetness we all love.
So, why is making rock candy such a fun project? First off, it’s an engaging activity for people of all ages. Whether you’re a young professional looking to impress friends with your culinary skills, or planning an educational experience for kids, rock candy fits the bill perfectly. Not to mention, you get to experiment with flavors and colors, allowing for a DIY candy version that is truly unique, reflecting your personal taste.
Creating rock candy also presents an opportunity to explore the science behind crystallization. According to a study published by Scientific American, this kind of hands-on activity reinforces critical thinking and encourages curiosity, making it a perfect blend of fun and learning (Scientific American).
When you embark on this sweet adventure, you’ll need just a few basic ingredients: sugar, water, and a flavoring of your choice. Then, all you have to do is wait as the magic happens! The patience required can be a lesson in itself, as the transformation from liquid to delightful crystals unfolds. In the end, not only do you get to savor your homemade dessert, but you also achieve a sense of accomplishment that’s hard to beat.
So if you’re ready for a yummy and educational experience, grab your ingredients and let’s dive into the enchanting world of rock candy! It’s sure to be a sweet journey worth taking. Who knows, you may even find yourself experimenting with different shapes or colors—a candy creation that invites creativity and fun!
Ingredients for Rock Candy
Essential ingredients for homemade rock candy
Creating your own rock candy is not only a fun kitchen experiment but also gives you that satisfying feeling of achievement when you see those beautiful sugar crystals form. To start your rock candy venture, you’ll need just a few basic ingredients:
- Granulated sugar: The key player, as this is the main component that crystallizes.
- Water: Necessary for dissolving the sugar. Tap water works perfectly fine!
- Wooden skewers or string: These act as the structure for sugar crystals to form around.
You can typically find all of these ingredients in your pantry or local grocery store. For more info on sugar crystallization, check out this helpful resource.
Optional ingredients for flavor and color
Want to spice up your rock candy? You can easily customize it with additional elements:
- Food coloring: A few drops can transform clear crystals into vibrant, stunning shades.
- Extracts: Flavor your candy with vanilla, peppermint, or even fruity flavors. Just add a teaspoon to the syrup!
- Juices: Replace part of the water with fruit juice for a delicious twist.
Experimenting with these optional ingredients can elevate your homemade rock candy, making it a delightful treat to share with friends or enjoy yourself! Feel free to check out this guide on flavor pairings for more inspiration.
With these ingredients, your rock candy journey is just beginning—happy candy-making!
Preparing Rock Candy
Making rock candy is more than just a sweet treat; it’s a fun experiment that can make you feel like a scientist in the kitchen. If you’re ready to give your sweet tooth a tasty project, let’s break down the steps involved in preparing this sugary delight!
Gather your ingredients and supplies
Before you dive into the sweet science of rock candy, it’s important to gather everything you’ll need. Here’s your shopping list:
-
Ingredients:
-
Water
-
Granulated sugar (about 3 cups)
-
Food coloring (optional, but fun!)
-
Supplies:
-
A clean jar or glass (medium to large size)
-
Wooden skewers or clean string
-
A saucepan
-
A stirring spoon
-
A candy thermometer (optional)
Having everything on hand will help things go smoothly. If you’re curious about the science behind sugar crystallization, you might want to check out resources like Science Buddies for a deeper understanding.
Prepare the skewers for crystal growth
The next step is to prepare your skewers for the magic of crystal growth. You want your rock candy to cling to them just right, so let’s create a surface that’s inviting for sugar crystals:
- Dissolve about 1 cup of sugar in a bit of hot water to create a slurry.
- Dip each skewer into the slurry and then roll them in granulated sugar. This sugar coating acts as a “starter” for your candy crystals, giving them a place to form.
- Set them aside in a dry place to let them harden.
This little prep step is crucial; without it, you may end up with a bunch of sugar sitting at the bottom of your jar, rather than the delightful rock candy you’re aiming for!
Create the sugary syrup
Now it’s time to whip up your sugary syrup, which is the heart of your rock candy creation. Here’s how to do it:
- In a saucepan, combine 3 cups of water with 9 cups of granulated sugar. This may sound like a lot, but trust me—sweetness is key!
- Heat the mixture over medium heat, stirring continuously. Keep stirring until the sugar has completely dissolved and the mixture begins to simmer, creating a syrup.
- If you’re feeling adventurous, add a few drops of food coloring at this stage for a pop of color in your rock candy.
Want to make sure your syrup is the right consistency? You can use a candy thermometer to check that dinner-time syrup reaches a temperature of approximately 240°F (soft ball stage) before removing it from the heat.
Cool down the syrup before adding skewers
Once your syrup is ready, it’s important to let it cool a bit before adding the skewers:
- Remove the saucepan from heat and let the syrup sit until it cools down to about room temperature.
- This cooling period gives the sugar crystals a better chance to form once you introduce the skewers.
Adding the skewers too soon can disrupt the process, resulting in a soggy mess rather than the crunchy rock candy you’re dreaming of.
Let the crystals grow over several days
Here’s where the magic happens! You’ll need to exercise your patience as the crystals start to grow:
- Carefully position the skewers in the cooled syrup, ensuring they’re suspended in the middle (not touching the bottom or sides of the jar).
- Cover the jar with a clean cloth or paper towel to keep dust out, but allow air flow.
- Store the jar in a cool, undisturbed place for about 5 to 7 days.
During this time, you might want to check in daily. What’s happening inside your jar? You might notice tiny crystals forming, and in just a few days, you’ll have a beautiful cluster of rock candy!
As you strive to create your own version of this nostalgic treat, keep in mind that everyone’s results can vary, depending on humidity levels and other factors. But isn’t that part of the charm?
Once your rock candy has finished growing, you’ll be rewarded with a confectionery creation that’s a sweet testament to your patience and hard work. Plus, they’ll make great gifts, party favors, or just a fun snack for movie nights!
Keep exploring the sweet possibilities, and happy candy-making!
Variations on Rock Candy
Rock candy isn’t just a classic treat; it’s a canvas for your creativity! If you’re looking to spruce up your sugar crystals, here are some delicious and eye-catching variations to try.
Flavored Rock Candy Options
Imagine biting into a piece of rock candy bursting with flavor! You can easily enhance your rock candy by adding extracts or oils. Some popular choices include:
- Vanilla: A classic that appeals to everyone.
- Mint: Refreshing and perfect for summer.
- Citrus: Lemon or orange extracts give a zesty kick.
- Almond: A unique twist that adds a nutty depth.
Start by adding just a few drops to your sugar syrup. Taste as you go to find your perfect flavor balance!
For more adventurous flavors, consider essential oils from high-quality brands. Just remember to use them sparingly, as a little goes a long way. You can learn more about flavoring options here.
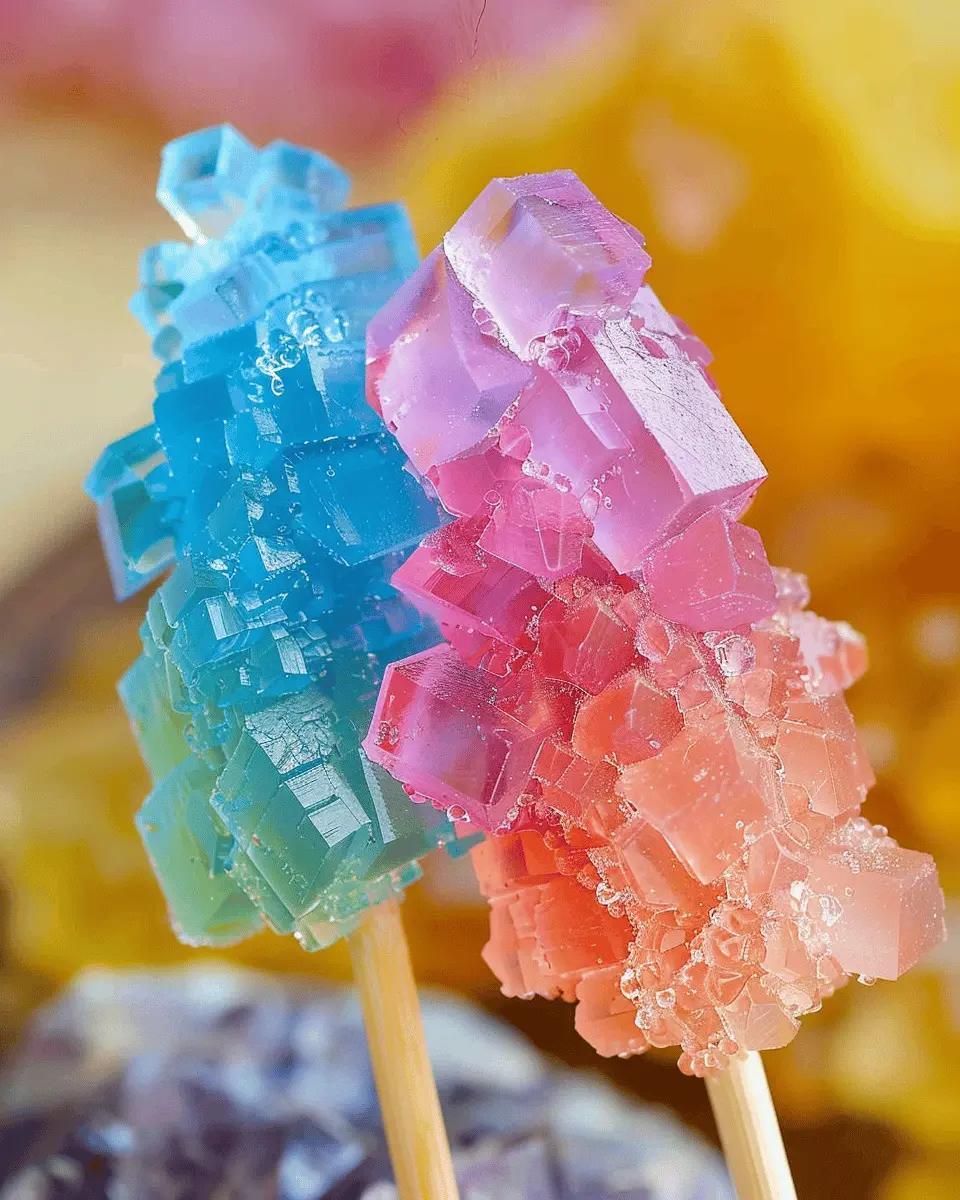
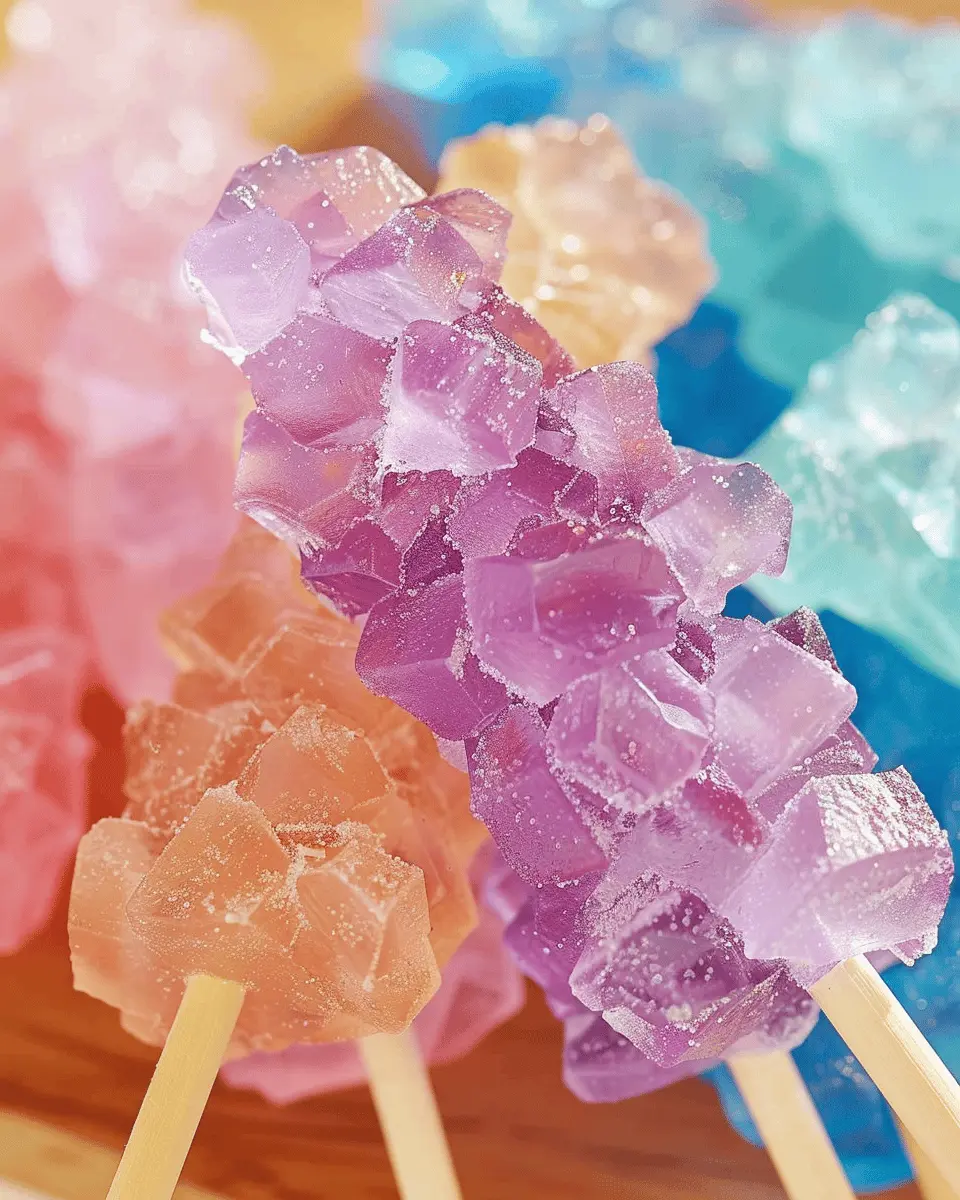
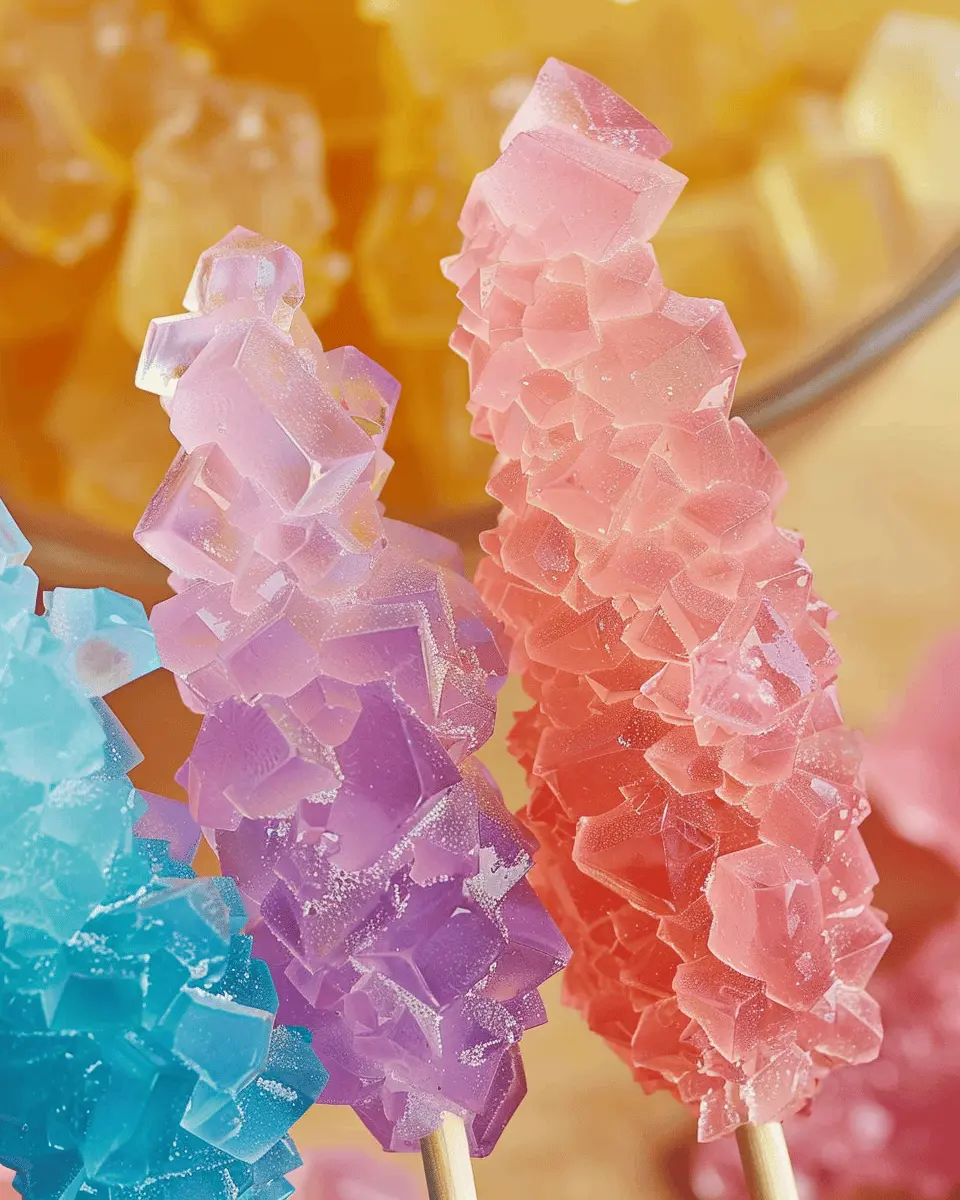
Colorful Rock Candy for Special Occasions
Want to make your rock candy stand out at parties or celebrations? Colorful variations can jazz up any event. Here’s how you can do it:
- Use food coloring: Divide your syrup into bowls and add different colors. This technique allows you to create a rainbow effect or a color scheme that matches your event.
- Layered colors: Pour a layer of one color and let it set before adding a different shade on top for a striped appearance. This can create stunning visual effects!
For a birthday or wedding, you might even consider incorporating edible glitter for extra sparkle! Check out tips on creating layered rock candy here.
Ultimately, rock candy is more than just a sweet treat—it’s a chance to add a personal touch to your celebrations. Give these variations a try, and let the sparkle of creativity shine through!
Cooking Tips and Notes for Rock Candy
Troubleshooting Common Rock Candy Issues
Making rock candy can be a delightful experience, but sometimes things don’t go as planned. If your rock candy isn’t forming crystals, it may be due to a few common issues:
- Temperature Matters: Make sure to boil your sugar syrup to a rolling boil—this helps achieve the right saturation level.
- Cleanliness is Key: Any impurities can disrupt crystal formation. Clean your jar and stick thoroughly before starting.
- Humidity Check: High humidity can mess with the crystallization process. Aim for a dry day to make your rock candy.
If it doesn’t turn out as expected, don’t lose hope! Even mistakes can lead to delicious sugar syrup to drizzle on your desserts.
Best Practices for Storing Your Rock Candy
Once you’ve made your beautiful rock candy, you’ll want to keep it fresh!
- Cool and Dry: Store your candies in a cool, dry location to prevent moisture from spoiling them.
- Air-Tight Containers: Using air-tight containers will help maintain their crunch and flavor.
- No Sunlight: Keep them out of direct sunlight to avoid melting or sticking together.
For more tips on sugar preservation, check out this expert guide. Enjoy your sweet creations, and remember that making rock candy is as much about patience and practice as it is about technique!
Serving Suggestions for Rock Candy
Creative ways to present rock candy
When it comes to serving rock candy, presentation is key. Consider using clear glass jars or decorative bowls to showcase the crystallized beauty of your candy. You can also use wooden skewers to create eye-catching lollipop-like displays. Tying on a colorful ribbon adds a personal touch, making your treat feel special. Perfect for parties, a simple arrangement of assorted colors can be both a decoration and a sweet delight!
Pairing rock candy with drinks or snacks
Want to elevate your rock candy experience? Pair it with refreshing beverages such as herbal iced teas or sparkling lemonade for a delightful contrast. The sweetness of the candy complements various snacks too! Think cheese platters with mild cheeses or fresh fruits like strawberries and apples. For an extra burst of flavor, try adding rock candy to homemade fruit-infused water, serving as both a sweetener and a charming decoration.
For more creative ideas, explore sources like The Spruce Eats and Food Network for inspiration that keeps your gatherings vibrant and engaging!
Time Breakdown for Rock Candy
Creating your own rock candy is a delightful journey, and knowing the time involved can help you plan better.
Preparation time
Get started by gathering your ingredients and equipment—this should take about 20 minutes. It’s a fun time to lay everything out, making sure you have everything at hand to ensure a smoother process.
Cooking time
Next up, you’ll spend roughly 15-20 minutes bringing your sugar-water mixture to a boil. This is where the magic begins, and the anticipation builds as you dissolve the sugar.
Crystal growing time
Lastly, the patience-testing phase: crystal growing! You’ll want to let your rock candy sit undisturbed for about 3-7 days. Yes, patience is key here, but the sweet reward will be worth every moment!
For more tips on rock candy construction, check out Smithsonian Magazine for fascinating candy-making science!
Nutritional Facts for Rock Candy
When you’re whipping up a batch of rock candy, it’s great to know what you’re treating yourself to. Here’s a quick look at its nutritional profile:
Calories per serving
A typical serving of rock candy (about 1 ounce or 28 grams) contains roughly 110 calories. While this may seem high for a small treat, it’s essential to enjoy these sweet gems in moderation as part of a balanced diet.
Sugar content
The primary ingredient in rock candy is sugar, contributing about 28 grams per serving. That’s a significant amount, so if you’re monitoring your sugar intake, be mindful of how much you indulge in.
Potential allergens
Rock candy is gluten-free and generally safe for most people. However, if you have a sugar allergy, this might not be the best choice for you. Always check ingredients carefully, especially if flavorings or colorings are added.
For more insights on sugar consumption and its effects on health, consider checking resources like the American Heart Association or the USDA for expert advice. Enjoy making your own rock candy while being mindful of its nutritional content!
FAQs about Rock Candy
Creating your homemade rock candy can be a fun and rewarding experience, but you might have some questions about its shelf life, storage, and how to make the most of your delicious creations. Let’s dive into some common FAQs!
How long does rock candy last?
Once your rock candy is fully formed and dry, it can last quite a while. Typically, it remains fresh for about 1 to 2 years when stored properly. For the best results, keep it in an airtight container in a cool, dry place. Moisture can cause the candy to dissolve or become sticky, so a little care goes a long way!
Can I reuse the sugar syrup?
If you’ve got leftover sugar syrup after making your rock candy, the great news is yes, you can reuse it! Simply allow it to cool, store it in a sealed container, and keep it in the refrigerator for future use. Just remember to monitor for any signs of crystallization, which might make it less effective for your next batch.
What can I do with leftover rock candy sticks?
After you’ve enjoyed your rock candy, those sticks can have a second life! Use them as fun stirring sticks for beverages, particularly iced teas or lemonades. Alternatively, you can crush them to create a colorful topping for ice cream or desserts, or simply save them as a sweet memory of your candy-making adventure!
For more tips on treating your candy properly, you can check out this helpful guide which has fantastic storage advice, too. Happy candy making!
Conclusion on Rock Candy
Creating rock candy at home is not just a fun kitchen adventure; it’s a mesmerizing journey into the world of sugar science. As you watch those sparkling crystals form, you can’t help but feel a sense of accomplishment. This delightful treat offers a unique way to explore flavors and colors, making it perfect for entertaining or gift-giving. By engaging in this project, you not only enjoy the sweet rewards but also share a memorable experience with friends or family. So why not dive into making your own rock candy and enjoy the delicious journey of crafting something truly unique? For tips on cooking techniques, check out resources from the Joy of Cooking.
PrintRock Candy Made Easy: A Fun Recipe to Satisfy Your Sweet Tooth
Learn how to make rock candy easily at home with this fun and simple recipe.
- Prep Time: 10 minutes
- Cook Time: 5 minutes
- Total Time: 168 hours
- Yield: 1 jar 1x
- Category: Candy
- Method: Stovetop
- Cuisine: American
- Diet: Vegetarian
Ingredients
- 2 cups granulated sugar
- 1 cup water
- 1 teaspoon flavor extract (like vanilla or mint)
- Food coloring of your choice
Instructions
- In a saucepan, combine water and sugar and stir over medium heat until sugar dissolves.
- Bring to a boil and then remove from heat. Add flavor extract and food coloring.
- Pour the mixture into a clean jar and suspend a clean wooden stick in the middle.
- Let the jar sit undisturbed for about a week until the rock candy forms.
Notes
- Make sure the jar is completely clean to prevent impurities.
- Do not stir the solution once it’s cooling in the jar.
Nutrition
- Serving Size: 1 piece
- Calories: 50
- Sugar: 12g
- Sodium: 0mg
- Fat: 0g
- Saturated Fat: 0g
- Unsaturated Fat: 0g
- Trans Fat: 0g
- Carbohydrates: 13g
- Fiber: 0g
- Protein: 0g
- Cholesterol: 0mg
Keywords: Rock Candy, Candy Recipe, Homemade Candy