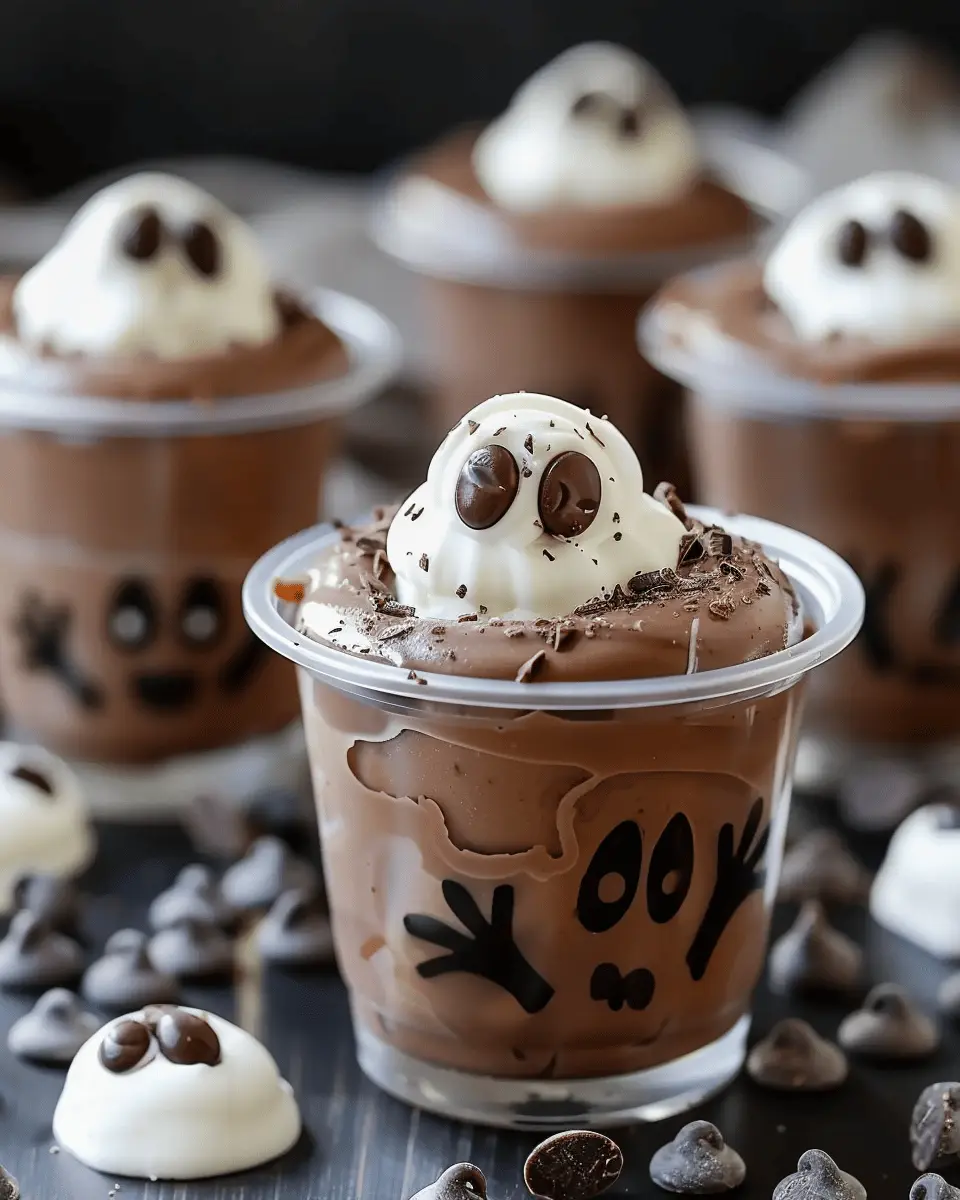
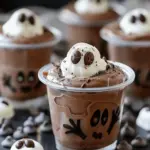
Introduction to Easy Ghosts in the Graveyard Chocolate Pudding Cups
Halloween is just around the corner, and if you’re looking to impress with some fantastically spooky treats, you’ve come to the right place. The Easy Ghosts in the Graveyard Chocolate Pudding Cups are a delightful, no-fuss dessert that can turn any gathering into a ghoulishly fun event. Using simple ingredients, these pudding cups combine the rich, creamy goodness of chocolate with an adorable ghostly twist, making them perfect for both kids and adults alike.
Why Homemade Halloween Treats Are a Game Changer
When it comes to throwing a Halloween party or just enjoying a festive night in, homemade treats elevate the atmosphere and show your guests that you care. Preparing sweets at home not only allows you to customize flavors and decorations but also gives you a chance to bond with family and friends over the spirit of the holiday. According to a study from the National Confectioners Association, 70% of people enjoy homemade treats more than store-bought options.
Imagine digging into a chocolate pudding cup layered with crushed cookies and topped with whimsical ghost decorations. It’s not just about taste; it’s an experience. You could set up a little decorating station where everyone gets to create their own versions of these delectable desserts—it’s an engaging way to unleash creativity and have fun!
The best part? You won’t need fancy techniques or hard-to-find ingredients. Just a few staples from your pantry and some creativity, and voilà! Just like that, you’ll have a dessert that not only tastes amazing but also adds to the festive decor.
In crafting these Easy Ghosts in the Graveyard Chocolate Pudding Cups, you bring a taste of Halloween to life. Plus, you can cater to various dietary preferences by substituting ingredients as needed, ensuring everyone is included in the fun. Check out more ideas on fun Halloween treats from sites like The Pioneer Woman or Taste of Home!
So, ready to scare up some fun in the kitchen? Let’s dive into the recipe for these spooky yet scrumptious dessert cups!
Ingredients for Easy Ghosts in the Graveyard Chocolate Pudding Cups
Creating your own Easy Ghosts in the Graveyard Chocolate Pudding Cups is not only a delightful treat but also surprisingly simple with the right ingredients. Let’s dive into what you’ll need to conjure up these spooky desserts!
The Essential Ingredients List
To whip up this fun Halloween dessert, gather these ingredients:
- Chocolate pudding (instant is fine!)
- Milk (2% or whole for creaminess)
- Whipped cream (for ghostly topping)
- Chocolate sandwich cookies (crushed, to create the “dirt” layer)
- Candy eyes (for that cute, spooky touch)
- Gummy worms (optional, to enhance the graveyard theme)
These common ingredients make it easy to create a tasty and visually appealing dessert that your friends and family will adore.
Alternatives for Dietary Preferences
For those with specific dietary needs, don’t fret! Here are some alternatives that can help you still enjoy these Easy Ghosts in the Graveyard Chocolate Pudding Cups:
- Substitute regular milk with almond milk or oat milk for a dairy-free option.
- Use coconut whipped cream instead of traditional whipped cream for a vegan-friendly twist.
- If you’re gluten-free, ensure your chocolate cookies are certified gluten-free.
Experimenting with these alternatives will allow you to create a version just right for your guests! Need more inspiration? Check out this article on creating festive treats to further enhance your Halloween atmosphere!
Step-by-Step Preparation for Easy Ghosts in the Graveyard Chocolate Pudding Cups
Get ready for a delightful and spooky dessert that is as fun to make as it is to eat! These Easy Ghosts in the Graveyard Chocolate Pudding Cups are perfect for Halloween gatherings or just a fun family project. Let’s dive into a simple step-by-step preparation guide that will have you whipping up these festive treats in no time.
Prepare the Pudding Base
First things first, you’ll want to create a luscious chocolate pudding base. You can use instant pudding mix for a quick shortcut or whip up a homemade version if you’re feeling adventurous. Here’s a simple approach using instant pudding:
- Combine 2 cups of cold milk with one package (3.9 oz) of chocolate pudding mix in a mixing bowl.
- Whisk for about 2 minutes until it thickens.
- Once blended, let it sit for 5 minutes to ensure it’s nice and set.
Using high-quality cocoa powder can elevate the flavor, so consider brands like Valrhona or Ghirardelli if you opt for homemade (find more about their rich flavors here and here).
Whip the Cream
Next up is the whipped cream. This adds a fluffy texture and a bit of lightness to your pudding cups.
- In a clean mixing bowl, add 1 cup of heavy whipping cream.
- Beat on medium-high speed until soft peaks form, usually about 3-4 minutes.
- For added sweetness, you can blend in about 2 tablespoons of powdered sugar and a splash of vanilla extract.
Stirring in some of the cold pudding will help achieve a smooth consistency, perfect for piping. You can use a hand-held mixer or a whisk—whatever you prefer!
Assemble the Pudding Cups
Now, it’s time to bring everything together. Grab some clear cups or small bowls for serving.
- Start with a generous layer of chocolate pudding at the bottom of each cup.
- Add a layer of whipped cream on top of the pudding. You can use a spoon or a piping bag for a more professional look.
Make sure these layers are visible through the clear cups to showcase that delicious chocolate base!
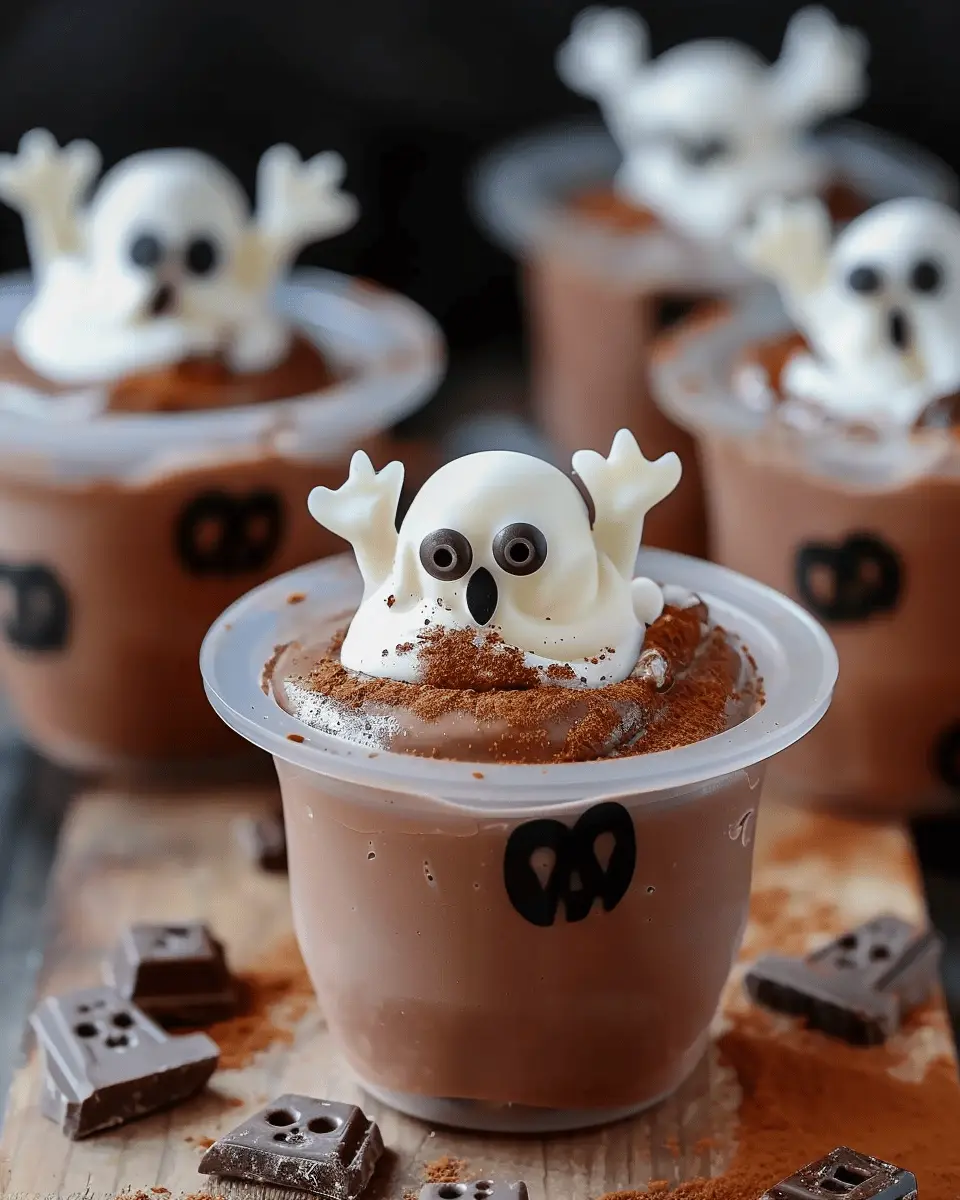
Create the Oreo “Dirt”
What’s a graveyard without some dirt? It’s time to make that scrumptious Oreo crumble. This is an easy and tasty task!
- Grab about 10 Oreo cookies and crush them into fine crumbs. You can place them in a zip-lock bag and use a rolling pin for less mess.
- Sprinkle the crushed Oreos over the whipped cream layer in each cup to create the “dirt” effect.
The contrast of chocolate and cream is not just flavor-packed but visually stunning!
Craft the Milano Tombstones
For added spookiness, we need to make tombstones. Milano cookies work great for this!
- Use a food-safe marker to write fun (or spooky!) “RIP” messages on the cookies.
- Insert a Milano into the Oreo layer, tilting it slightly for a realistic grave marker effect.
These simple tombstones add character and your guests will love the personal touches.
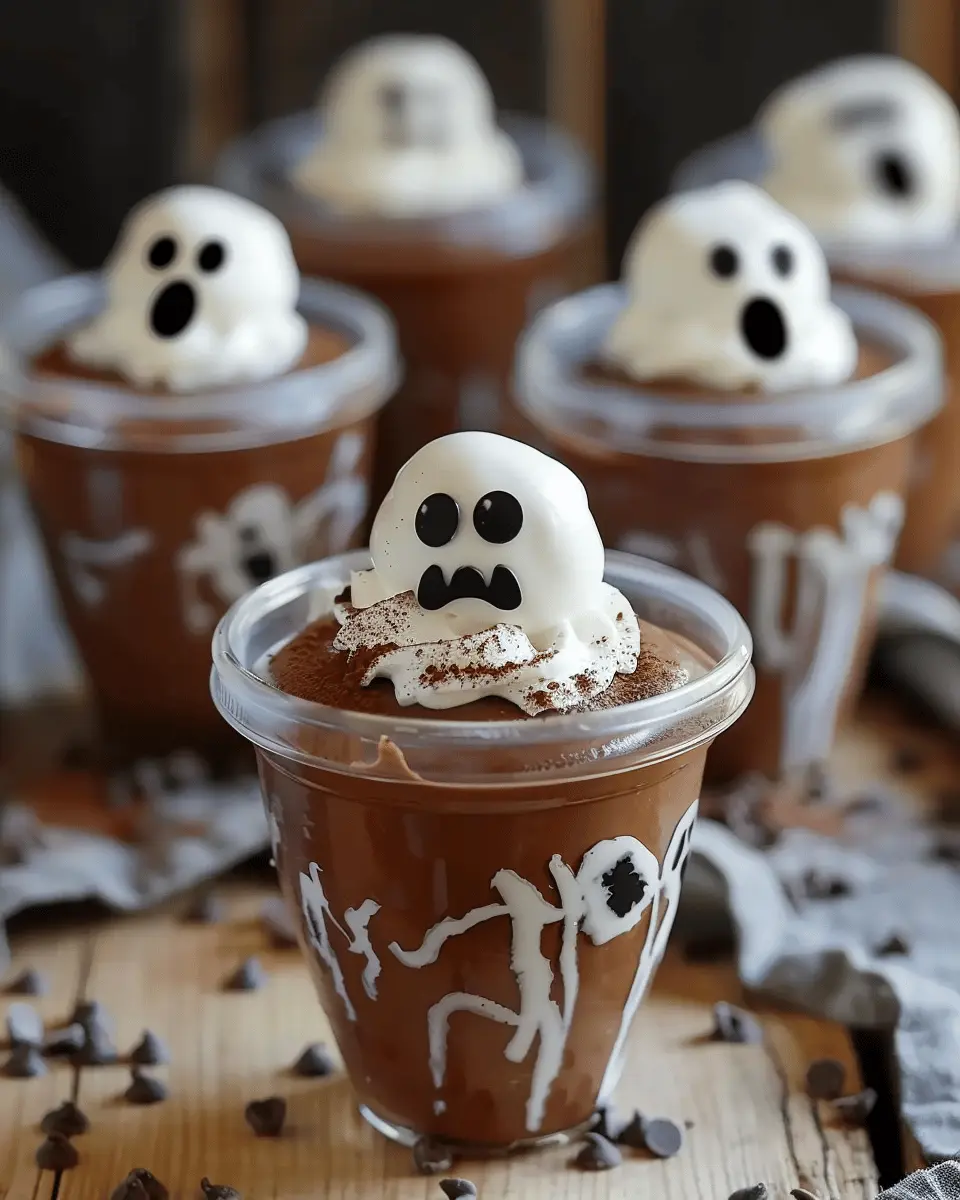
Pipe on the Whipped Ghosts
It’s time to make those whimsical ghosts that steal the show!
- Using a piping bag fitted with a round tip, pipe small dollops of whipped cream to create ghost shapes on top of the tombstones.
- Don’t forget to add cute little eyes with chocolate chips or mini chocolate dots.
These ghostly figures bring your cups to life and make them perfect for the occasion!
Add Fun Decorative Surprises
Finally, why not add some extra flair? Here are some ideas to elevate your Easy Ghosts in the Graveyard Chocolate Pudding Cups:
- Place gummy worms on top of the Oreo “dirt” for a creepy-crawly touch.
- Use candy corn or edible glitter to create a festive finish.
Feel free to get creative! Your imagination is your only limitation here.
By following these simple steps, you’ll create a dessert that not only tastes amazing but also captivates the spirit of Halloween. Enjoy your Easy Ghosts in the Graveyard Chocolate Pudding Cups, and remember, it’s all about the fun in the kitchen!
Variations on Easy Ghosts in the Graveyard Chocolate Pudding Cups
When it comes to Easy Ghosts in the Graveyard Chocolate Pudding Cups, the fun doesn’t stop with just one flavor or decoration—there are numerous ways to get creative! Let’s dive into some exciting variations that will make your dessert the star of the spooky season.
Swaps for Pudding Flavors
While the traditional chocolate pudding is delicious, why not mix it up? Here are a few flavor swaps that maintain the fun while offering something new:
- Vanilla Pudding: For a classic take, use vanilla pudding and add a splash of vanilla extract to enhance the flavor.
- Caramel Pudding: For a sweet twist, caramel pudding brings a delightful richness that pairs perfectly with the “graveyard” theme.
- Pumpkin Spice Pudding: Perfect for fall, this flavor adds a seasonal touch and a hint of whimsy to your cups.
Feel free to check out this great resource on pudding variations for more ideas.
Creative Decorations Beyond the Basics
While ghostly whipped cream and crushed cookie crumbs make a great base, consider expanding your creative horizons!
- Chocolate-Covered Bugs: Edible candy critters can add an element of surprise.
- Candy Corn Tombstones: Use candy corn for tombstones, writing funny epitaphs with a food-safe marker.
- Gummy Worms: Layer gummy worms peeking out of the pudding to give an earthier vibe—perfect for that graveyard aesthetic.
No need to stick to the basics! Customizing your Easy Ghosts in the Graveyard Chocolate Pudding Cups can really make your dessert stand out at any Halloween gathering. If you’re looking for more inspiration, sites like Pinterest are treasure troves of creative ideas.
With these simple variations, you’ll be able to enchant your guests and leave them craving more. Happy haunting!
Cooking Tips and Notes for Easy Ghosts in the Graveyard Chocolate Pudding Cups
Tips for Achieving the Best Texture
To make the Easy Ghosts in the Graveyard Chocolate Pudding Cups extra creamy, start with high-quality cocoa powder and full-fat milk for that rich flavor. Be sure to whisk the pudding mixture continuously to prevent lumps—nobody likes a gritty dessert! For an even smoother texture, consider blending the pudding in a food processor after it’s chilled. This little trick creates a velvety finish that’s hard to resist.
Notes on Make-Ahead Strategies
Planning a spooktacular gathering? These pudding cups are perfect for make-ahead fun! You can prepare the pudding and layer it in your cups a day in advance. Just keep them covered in the fridge to maintain freshness. Don’t forget to add the ghost decorations right before serving; they’ll look more adorable that way! Ideally, a quick search can guide you through the best storage practices for desserts, like those on FoodSafety.gov.
So, why not whip up these delightful treats ahead of time and impress your friends with your culinary skills? After all, Halloween is all about creativity!

Serving Suggestions for Easy Ghosts in the Graveyard Chocolate Pudding Cups
Creative Ways to Present Your Dessert
When making your Easy Ghosts in the Graveyard Chocolate Pudding Cups, presentation is everything! Consider serving them in clear, small plastic cups or mason jars to showcase the delightful layers of chocolate and the spooky ghostly toppings. Try adding crumbled cookies on top as “grave soil” or using edible glitter for a whimsical touch. You can even add mini plastic gravestones or spooky ornaments to each cup for extra flair. The goal is to make every dessert feel like a festive centerpiece that invites friends and family to dig in!
Pairings that Elevate the Experience
To truly enjoy your Easy Ghosts in the Graveyard Chocolate Pudding Cups, think about pairing them with complementary flavors. A side of fresh berries can add a zesty contrast that balances the richness of the chocolate. Alternatively, consider serving them with a warm vanilla sauce or whipped cream to enhance the dessert’s creaminess. For a welcoming fall twist, a pumpkin spice latte makes for an excellent drink option that rounds out your spooky dessert experience.
With these creative serving suggestions, your pudding cups will not only taste amazing but look incredible too! For more presentation ideas, check tutorials on platforms like Pinterest and YouTube.
Time Breakdown for Easy Ghosts in the Graveyard Chocolate Pudding Cups
Creating your Easy Ghosts in the Graveyard Chocolate Pudding Cups doesn’t have to feel daunting. Here’s a quick time breakdown to help you get started.
Preparation Time
You’ll need about 15 minutes to gather your ingredients and assemble the pudding cups. It’s a breeze to whip up and a perfect way to break up your routine!
Chill Time
Plan for two hours of chill time. This step is crucial for allowing the pudding to set properly and the flavors to meld, making each spoonful even more delightful.
Total Time Required
All in all, you’re looking at a total of approximately two hours and 15 minutes from start to finish. Consider pairing this treat with a fun Halloween movie or a small gathering to enhance your experience!
For more creative Halloween ideas, check out this Halloween Decor guide. It’s a great way to make your celebration unforgettable!
Nutritional Facts for Easy Ghosts in the Graveyard Chocolate Pudding Cups
Serving Size
The delightful Easy Ghosts in the Graveyard Chocolate Pudding Cups recipe serves about 4 people, making it a perfect treat for a small gathering or a cozy night in. Each cup is a charming blend of fun and indulgence that can easily satisfy your sweet tooth!
Calories
Each serving contains approximately 150 calories. This is a reasonably guilt-free option for a dessert, especially when you consider the joy it brings to your Halloween festivities. Remember, balance is key, and it’s okay to indulge every now and then!
Key Nutrients
In addition to their delectable taste, these Easy Ghosts in the Graveyard Chocolate Pudding Cups offer essential nutrients:
- Calcium: Great for bone health, thanks to the milk base.
- Iron: Essential for circulating oxygen in your blood.
- Fiber: If you use whole-grain crumbs for the “dirt,” you’ll add a nice dose of dietary fiber to help with digestion.
Looking to up your nutritional game? Check out resources like the USDA FoodData Central to dive deeper into the nutritional aspects of the ingredients you use. Enjoy these spooky delights knowing they bring a bit of nourishment alongside the fun!
FAQs about Easy Ghosts in the Graveyard Chocolate Pudding Cups
Can I Make These Ahead of Time?
Absolutely! One of the best things about Easy Ghosts in the Graveyard Chocolate Pudding Cups is their versatility when it comes to timing. You can prepare the pudding cups a day in advance and store them in the refrigerator. Just be sure to add the ghost decorations right before serving; this keeps them looking fresh and spooky!
What Can I Use Instead of Oreos?
If Oreos aren’t your thing or if you have dietary restrictions, don’t worry! There are plenty of alternatives:
- Graham Crackers: Crushed graham crackers can provide a similar texture.
- Brownie Crumbs: For a rich twist, use crushed brownies instead.
- Gluten-Free Cookies: There are many gluten-free chocolate cookies on the market that work well too.
You can experiment with flavors to find what suits your taste best!
How Do I Store Leftover Pudding Cups?
Storing leftover Easy Ghosts in the Graveyard Chocolate Pudding Cups is pretty straightforward. Cover them tightly with plastic wrap or transfer them to an airtight container to keep everything fresh. Ideally, consume the pudding within 2-3 days to ensure the best flavor and texture. If your ghost toppers have been added, they may get a bit soggy, so consider saving some toppings to add just before serving.
These pudding cups are not only a delightful treat for Halloween but also a great conversation starter at any fall gathering. Plus, their easy preparation means you can whip them up even when you’re short on time! For more Halloween inspiration, check out resources like Food Network or Bon Appétit.
Conclusion on Easy Ghosts in the Graveyard Chocolate Pudding Cups
Why You’ll Love Making These Fun Treats
Creating Easy Ghosts in the Graveyard Chocolate Pudding Cups is not just about satisfying your sweet tooth; it’s also a wonderful way to bond with friends or family during the spooky season. These delightful treats are visually appealing and incredibly simple to prepare, which makes them perfect for busy young professionals looking to impress at parties or celebrations.
You’ll enjoy the satisfaction of crafting something that looks as good as it tastes—think layers of creamy pudding, crumbled cookies for dirt, and charming marshmallow ghosts topping it off. They’re an engaging conversation starter, too! So, gather your ingredients, put on some music, and enjoy a delightful baking adventure. Not only can you find inspiration from resources like Food Network and Taste of Home, but you’ll also have a delightful dessert that will leave a lasting impression!
PrintEasy Ghosts in the Graveyard Chocolate Pudding Cups for Spooky Fun
Delight in these fun and spooky dessert cups perfect for Halloween!
- Prep Time: 20 minutes
- Cook Time: 0 minutes
- Total Time: 20 minutes
- Yield: 4 servings 1x
- Category: Dessert
- Method: No-bake
- Cuisine: American
- Diet: Vegetarian
Ingredients
- 2 cups chocolate pudding
- 1 cup whipped cream
- 1 package Oreo cookies
- 4 candy eyes
- 1 container of gummy worms
Instructions
- Prepare the chocolate pudding according to package directions.
- Crush the Oreo cookies and set aside.
- In serving cups, layer chocolate pudding and crushed Oreos.
- Top with whipped cream and place candy eyes on top.
- Finish with gummy worms for a spooky effect.
Notes
- Use different candy types for embellishment.
- These desserts can be made a day in advance.
Nutrition
- Serving Size: 1 cup
- Calories: 300
- Sugar: 20g
- Sodium: 150mg
- Fat: 15g
- Saturated Fat: 8g
- Unsaturated Fat: 5g
- Trans Fat: 0g
- Carbohydrates: 30g
- Fiber: 2g
- Protein: 3g
- Cholesterol: 30mg
Keywords: ghost dessert, Halloween pudding, spooky dessert