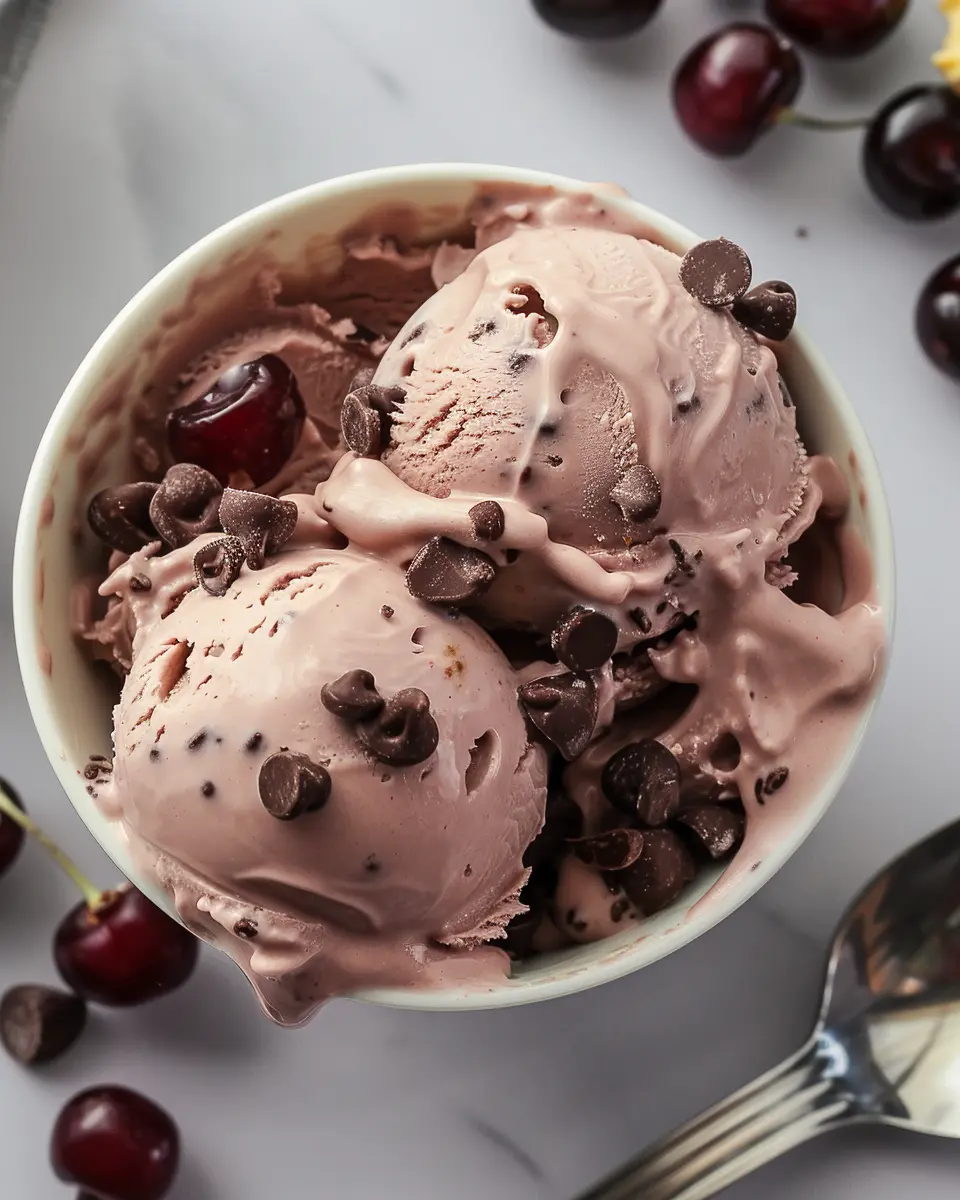
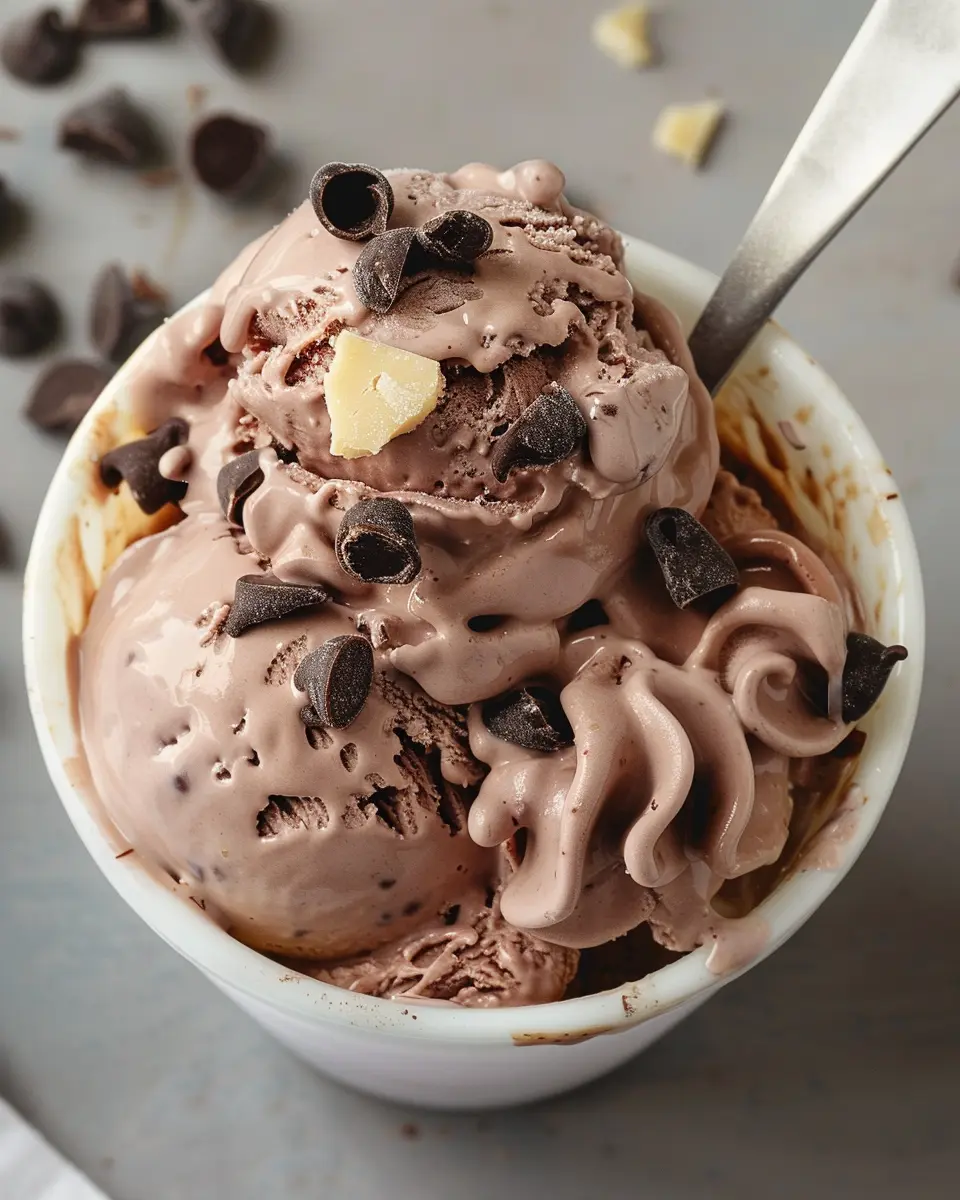
Introduction to Easy Ninja Creami Cherry Chocolate Ice Cream
Why Homemade Ice Cream?
Have you ever indulged in a rich, creamy scoop of ice cream on a hot summer day and thought about how amazing it would be to enjoy that sweetness any time you want? Well, making ice cream at home is not just easy; it’s a rewarding experience that lets you control the ingredients. You can customize flavors to suit your taste buds, ensuring every bite is exactly how you like it. Plus, with countless health-conscious alternatives available, homemade ice cream can be a guilt-free treat. Did you know that homemade ice cream can be made with less sugar and no artificial additives, making it a much healthier option?
The Magic of the Ninja Creami
Enter the Ninja Creami, a revolutionary kitchen appliance that takes the hassle out of ice cream making. Unlike traditional ice cream makers that require pre-freezing bowls and tedious mixing, the Ninja Creami offers a streamlined process that turns your chosen base into soft-serve perfection in minutes. Just prepare your mixture, freeze it in the special container, and then let the Ninja do its magic. This appliance really opens doors to creativity in the kitchen, enabling you to whip up a variety of frozen delights like sorbets, gelatos, and, of course, our easy Ninja Creami cherry chocolate ice cream! With its user-friendly interface and quick clean-up, even busy young professionals can fit ice cream making into their hectic schedules.
What to Expect from This Recipe
When you try this easy Ninja Creami cherry chocolate ice cream recipe, you can expect a delightful blend of flavors that balance the tartness of cherries with the smooth richness of chocolate. It only takes a few simple ingredients—fresh cherries, cocoa powder, and your choice of sweetener.
Here’s what you can look forward to:
- Quick and Easy Preparation: The entire process from mixing to enjoying can be done in under an hour (including freezing time).
- Customizable Flavors: Feel free to switch out cherries for your favorite fruits or mix in nuts for an extra crunch. Getting creative is part of the fun!
- Healthier Indulgence: A homemade version means you can control the sugar and use healthier options without compromising on taste.
This fabulous ice cream is a perfect treat for any occasion or just a sweet reward after a long day. Prepare to impress your friends and family with your new dessert-making skills!
Ingredients for Easy Ninja Creami Cherry Chocolate Ice Cream
Essential Ingredients
To whip up your easy Ninja Creami cherry chocolate ice cream, you’ll need a handful of simple, fresh ingredients. Here’s what you’ll want to gather:
- Fresh cherries: Look for ripe, sweet cherries for that burst of flavor.
- Heavy cream: This adds richness and a luxurious mouthfeel.
- Sweetened condensed milk: It sweetens and helps create that creamy texture.
- Cocoa powder or chocolate: This is where the chocolatey goodness comes from!
- Vanilla extract: Just a splash enhances all the flavors beautifully.
These are the foundation of your delightful frozen treat. You might consider organic or non-dairy substitutions if you’re looking for healthier or plant-based alternatives.
Chocolate vs. Cocoa Powder
When deciding between chocolate and cocoa powder for your easy Ninja Creami cherry chocolate ice cream, there are a few things to think about.
- Cocoa powder is the lighter option and gives a rich chocolate flavor without the added fat of chocolate bars. This can be great if you’re calorie-conscious.
- On the other hand, using melted chocolate will give a more intense flavor and creamy texture thanks to its fat content.
Choose based on your preference—either option will deliver a scrumptious result that will have your friends asking for seconds! For more information, check out this guide on the differences between cocoa powder and chocolate from Serious Eats.
With these ingredients at hand, you’ll be well on your way to a delightful dessert that’s sure to impress!
Step-by-step Preparation of Easy Ninja Creami Cherry Chocolate Ice Cream
Making your own ice cream at home can seem like an indulgent dream, but with the help of your Ninja Creami, it’s both effortless and rewarding. In this section, I’ll walk you through each step of creating your easy ninja creami cherry chocolate ice cream, so let’s get started!
Gather your ingredients
Before diving into the delicious world of homemade ice cream, it’s crucial to have everything you need on hand. Trust me; the last thing you want is to be searching for a missing ingredient halfway through. Here’s what you’ll need for your easy ninja creami cherry chocolate ice cream:
- 2 cups heavy cream: Provides that rich, creamy texture.
- 1 cup whole milk: Balances the richness and creates a lighter feel.
- 3/4 cup granulated sugar: Sweetens the mix; feel free to adjust according to your taste.
- 1 teaspoon vanilla extract: Adds a touch of warmth and depth.
- 1 cup cherry pie filling: For that delightful cherry flavor.
- 1/2 cup dark chocolate chunks: Choose a high-quality chocolate for the best experience.
Once you have these ingredients ready, you’re set for an ice cream adventure.
Whisk together the base
Next up, you’ll need to create your ice cream base. In a large mixing bowl, whisk together the heavy cream, whole milk, sugar, and vanilla extract until the sugar is fully dissolved. This step is essential because it sets the stage for the smooth texture of your ice cream.
Why use a whisk? A whisk incorporates air into the mixture, which will create a light and fluffy ice cream. For a more visual guide, check out this article on how to properly whisk ingredients for various recipes.
Freeze your mixture
Once you’ve whisked your base to silky perfection, it’s time to put it in the freezer. Pour the mixture into your Ninja Creami pint container and seal it with the lid. Freeze the container for at least 24 hours. If you’re anything like me, the anticipation will be the hardest part!
A quick tip: Make sure your freezer is set to a temperature of 0°F (-18°C) or lower. This allows the mixture to solidify properly, leading to that incredible scoopable consistency.
Churn with the Ninja Creami
After the long wait, get ready for the fun part! Once your ice cream base is fully frozen, it’s time to churn it in your Ninja Creami. Remove the pint from the freezer and let it sit for about 10 minutes to slightly soften—this will help the machine do its magic.
Secure the pint into the Ninja Creami base and select the “ICE CREAM” function. In just a few minutes, you’ll see your frozen mixture transform into a smooth, creamy delight. It’s like watching magic happen right in your kitchen!
Incorporate cherries and chocolate chunks
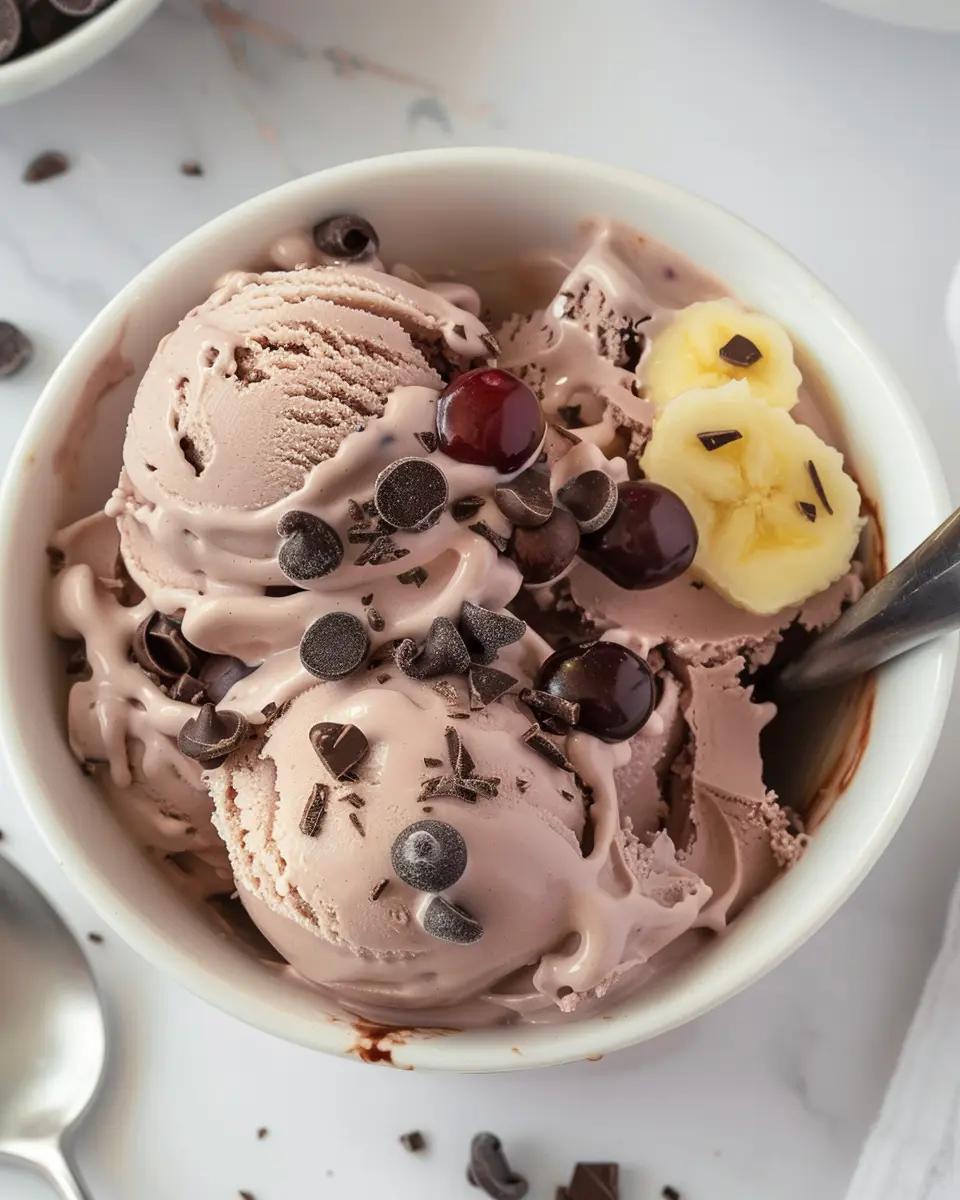
Now, let’s take your easy ninja creami cherry chocolate ice cream to the next level. After churning, you’ll want to fold in the cherry pie filling and dark chocolate chunks. Use a spatula to gently mix them in, ensuring that every bite will have that burst of cherry and decadent chocolate.
For an extra twist, consider adding nuts or other mix-ins! Not only do they add texture, but they also elevate the flavor profiles.
Scoop and serve
Finally, the moment you’ve been waiting for—scooping and serving your creation! Use an ice cream scoop to dish out the easy ninja creami cherry chocolate ice cream into bowls or cones.
Consider garnishing with extra chocolate chunks and a drizzle of cherry sauce for an extra touch of sophistication. Whether it’s a special occasion or just a Tuesday evening, you’ve created something truly delightful.
So, the next time you’re looking for a sweet treat to cool down, remember this easy recipe. Homemade ice cream not only tastes better than store-bought but also allows you to customize it to perfection. Enjoy every creamy bite!

Variations on Easy Ninja Creami Cherry Chocolate Ice Cream
Cherry Chocolate Almond Delight
If you’re looking to elevate your easy ninja Creami cherry chocolate ice cream, why not add a twist of almond? Simply fold in some toasted almond slivers before you freeze it. The nutty flavor complements the rich chocolate and tart cherries beautifully. You could even finish it off with a drizzle of chocolate syrup for that extra indulgence. This creamy delight not only satisfies your sweet tooth but also adds a satisfying crunch, making every bite a treat.
Vegan Cherry Chocolate Ice Cream
Craving a dairy-free alternative? Transform your easy ninja Creami cherry chocolate ice cream into a vegan version by using full-fat coconut milk instead of regular cream. Blend the cherries and cocoa powder into the coconut milk, and sweeten with maple syrup or agave. The result? A luscious, plant-based ice cream that retains that same creamy texture while being kind to your dietary preferences. You might even find it hard to believe it’s vegan!
Other Mix-Ins to Try
Feeling adventurous? The possibilities are nearly endless with your easy ninja Creami cherry chocolate ice cream. Here are some fun mix-ins to consider:
- Crunchy granola for an added texture that’s perfect for breakfast treats.
- Chunks of dark chocolate, because more chocolate is always a good idea.
- Swirls of peanut butter for a nutty and delightful flavor pairing that is hard to resist.
- Fresh mint leaves for a refreshing burst that balances the richness.
Innovating with these additional flavors can help you customize your ice cream to fit your mood or the season. For more inspiration, check out resources like Serious Eats and Bon Appétit for creative mix-in ideas that will transform your ice cream experience.
Cooking Tips and Notes for Easy Ninja Creami Cherry Chocolate Ice Cream
Achieving the perfect texture
To create that creamy, dreamy easy Ninja Creami cherry chocolate ice cream, focus on the base mixture’s consistency. The ideal ratio of milk to cream is essential—aim for about 2:1 for richness without being overly heavy. You’ll want to freeze your mixture for at least 24 hours before processing it in your Ninja Creami for the best results. A longer freezing time helps achieve that soft-serve texture that’s so satisfying.
Tips for mixing ingredients
When blending your ingredients, start with the cherries and chocolate syrup in the bottom of your mixing bowl. This helps in evenly distributing their flavors throughout the ice cream. Use a whisk for a smoother blend and don’t be afraid to taste as you go! This way, you can adjust the sweetness to your liking. Lastly, consider adding a pinch of salt to enhance the flavors—it’s a game changer!
For more expert tips, check out Serious Eats or The Kitchn for further insights into creating the perfect frozen desserts. Happy cooking!
Serving Suggestions for Easy Ninja Creami Cherry Chocolate Ice Cream
Creative serving ideas
When it comes to enjoying your easy Ninja Creami cherry chocolate ice cream, the sky’s the limit! Start by serving it in stylish bowls or even fancy waffle cones for an extra touch of fun. Drizzle with rich chocolate sauce and sprinkle with crushed nuts or mini chocolate chips to amplify those textures and flavors. For a refreshing twist, why not top your scoop with a dollop of whipped cream and fresh cherries?
Another exciting idea is to create an ice cream sandwich. Soft chocolate chip cookies work wonders here. Just scoop that creamy delight between two cookies, and you’ve got a sweet treat that will wow your friends at any gathering!
Pairing with homemade desserts
Looking to elevate your dessert game? Pair your easy Ninja Creami cherry chocolate ice cream with warm desserts like brownies or a slice of warm apple pie. The combination of hot and cold will drive your taste buds wild!
If you want to explore more, how about serving alongside simple fruit salads? The tartness of the fruits complements the richness of the ice cream beautifully. You can even consider a homemade chocolate sauce from Chocolate.org to drizzle over both desserts for an indulgent experience.
With these serving suggestions, your ice cream adventure is bound to impress!
Time Breakdown for Easy Ninja Creami Cherry Chocolate Ice Cream
Preparation time
Making your easy Ninja Creami cherry chocolate ice cream starts with a quick prep. You’ll just need about 10 minutes to gather your ingredients and blend them. It’s a simple, fun process that sets the stage for a delightful treat.
Freezing time
Next comes the freezing phase, which typically takes around 24 hours. This is where the magic happens! Be sure to plan ahead—this is crucial for achieving that perfect creamy texture.
Total time
Adding it all up, your total time commitment is roughly 24 hours and 10 minutes. While it may seem lengthy, most of that time is just waiting for your ice cream to freeze to perfection! To learn more about freezing techniques, check out resources like the U.S. Dairy Export Council.
Now that you’ve got the timeline, you’re all set to dive into creating your delicious treat!
Nutritional Facts for Easy Ninja Creami Cherry Chocolate Ice Cream
Serving Details
When you whip up a batch of this easy Ninja Creami cherry chocolate ice cream, you’re creating a delightful treat that serves about four people. Each serving offers a perfectly balanced indulgence, ideal for a summer day or a cozy night in.
Key Nutritional Highlights
This cherry chocolate ice cream is not just delicious—it also packs a nutritional punch! Here are some of the key benefits:
- Calories: Approximately 160 calories per serving.
- Protein: With about 4 grams per serving, it’s a satisfying dessert that keeps you fuller longer.
- Healthy Fats: Contains beneficial fats, especially if you use real chocolate or nut butter.
- Antioxidants: The cherries not only add natural sweetness but also provide antioxidants that can help combat oxidative stress.
For an even deeper dive into the benefits of cherries, consider checking out the resources at the Cherry Marketing Institute.
Using quality ingredients makes a difference—not only in flavor but also in the overall health profile of your dessert. You can easily swap in alternatives for lower sugar or dairy-free options too. Adjusting the recipe allows you to craft the perfect treat that fits your nutritional needs without sacrificing flavor!
FAQs about Easy Ninja Creami Cherry Chocolate Ice Cream
What is the best way to store homemade ice cream?
Storing your easy ninja creami cherry chocolate ice cream properly ensures it stays delicious and creamy. Use an airtight container and layer a piece of parchment paper directly on the surface before sealing. This helps prevent ice crystals from forming. When you want to serve it again, simply remove it from the freezer and let it sit for 5-10 minutes to soften for scoopability. For the best quality, try to consume it within two weeks, but good luck keeping it around that long!
Can I use different fruits?
Absolutely! The beauty of making your own ice cream is the freedom to play with flavors. While cherries pair exquisitely with chocolate, feel free to experiment with other fruits. Strawberries, raspberries, or even bananas can create tasty alternatives. Be sure to consider the sweetness and acidity of the fruits you choose, as they heavily influence your end product. Looking for inspiration? Check out resources like The Kitchn for tips on fruit-infused ice creams.
How can I make it healthier without sacrificing taste?
Want to enjoy your easy ninja creami cherry chocolate ice cream guilt-free? Start by reducing added sugars or substituting with natural sweeteners like honey or maple syrup. You can also use low-fat yogurt or coconut milk for a creamy texture without the extra calories. Adding a splash of vanilla or cinnamon enhances flavor without added sugar. With a little creativity, indulging in this icy treat can still feel like a healthy choice! Consider visiting Healthline for further ideas on healthy dessert swaps.
By incorporating these tips, you’ll not only master your ice cream-making skills but also create a delightful treat that you can feel good about sharing!
Conclusion on Easy Ninja Creami Cherry Chocolate Ice Cream
Embracing homemade goodness
Creating your own easy Ninja Creami cherry chocolate ice cream not only delights your taste buds but also brings a touch of homemade goodness to your dessert repertoire. You get to control the flavor profile and the quality of ingredients, ensuring it’s as nutritious (or indulgent) as you desire. Plus, it’s a wonderful way to bond over sweet moments with friends and family, making memories one scoop at a time!
Your next dessert adventure!
Ready for your next dessert adventure? Dive into the world of homemade ice cream with this delightful recipe. With just a few simple ingredients, you can whip up a treat that impresses everyone. Whether you’re hosting a gathering or enjoying a quiet evening, this cherry chocolate delight is sure to become your go-to sweet fix. Why not give it a try? Your taste buds will thank you! For more inspiring ideas, check out other dessert classics at Serious Eats or The Kitchn.
Printeasy ninja creami cherry chocolate ice cream recipe for indulgent treats
Indulge in this delicious and easy recipe for Ninja Creami Cherry Chocolate Ice Cream.
- Prep Time: 15 minutes
- Total Time: 24 hours 15 minutes
- Yield: 4 servings 1x
- Category: Dessert
- Method: Freezing
- Cuisine: American
- Diet: Vegetarian
Ingredients
- 2 cups cherries, pitted
- 1 cup heavy cream
- 1 cup sweetened condensed milk
- 1/2 cup chocolate chips
- 1 tsp vanilla extract
Instructions
- Blend cherries in a blender until smooth.
- In a bowl, mix cherry puree with heavy cream, sweetened condensed milk, and vanilla extract.
- Pour the mixture into the Ninja Creami container.
- Freeze for 24 hours.
- Process in the Ninja Creami and mix in chocolate chips.
Notes
- For a richer flavor, use full-fat cream.
- Make sure to pit the cherries before blending.
Nutrition
- Serving Size: 1/2 cup
- Calories: 250
- Sugar: 20g
- Sodium: 50mg
- Fat: 15g
- Saturated Fat: 9g
- Unsaturated Fat: 5g
- Trans Fat: 0g
- Carbohydrates: 30g
- Fiber: 1g
- Protein: 4g
- Cholesterol: 40mg
Keywords: Easy Ninja Creami Cherry Chocolate Ice Cream