Introduction to Chocolate Easter Bars
Why Homemade Snacks Are Better for You
Let’s be real: store-bought snacks often come with ingredients we can barely pronounce, not to mention the hidden sugars and preservatives. When you whip up your own treats at home, like these delightful Chocolate Easter Bars, you have complete control over what goes into them. This means you can choose high-quality ingredients, cater to dietary restrictions, and even avoid artificial additives. Plus, there’s something incredibly satisfying about making a delicious treat from scratch. It’s a win-win for your health and your taste buds!
The Appeal of Chocolate at Easter
Easter isn’t just about the egg hunts and the festive gatherings; it’s also a time when we indulge in the sweet splendor of chocolate. From decadent bunnies to elaborate egg shapes, chocolate is a tradition that has stood the test of time. It’s no coincidence either; studies show that the smell and taste of chocolate can elevate your mood and create feelings of happiness. So, why not elevate your own Easter experience with homemade chocolate easter bars? You’ll enjoy the process and the product—and your loved ones will surely appreciate your effort!
A Quick Overview of the Recipe
Now that you’re excited about making your own treats, let’s take a peek at what this recipe involves. This isn’t just any chocolate bar; these Chocolate Easter Bars are rich, flavorful, and incredibly easy to make. You’ll start by melting high-quality chocolate—dark or milk, your choice! Then, you’ll mix in wholesome ingredients like nuts, dried fruits, or even a sprinkle of sea salt for that perfect contrast of flavors. Just pour the mixture into a lined pan, let it cool, and voila—your delicious Easter bars are ready to impress your friends and family.
If you’re ready to dive into this scrumptious adventure, stick around; the recipe is coming up next! And if you’re interested in exploring more about the benefits of homemade treats, check out this article on Healthier Snacking Options to inspire your culinary journey.

Ingredients for Chocolate Easter Bars
List of Ingredients Needed
Creating delicious chocolate Easter bars is a delightful process that requires just a handful of ingredients. Here’s what you’ll need:
- 1 cup semi-sweet chocolate chips
- 1 cup creamy peanut butter
- 2 cups crisp rice cereal
- 1/2 cup mini marshmallows
- 1/2 cup pastel-colored candies (think M&M’s or similar)
- 1/4 cup honey or maple syrup (for a healthier twist)
- A pinch of salt
Highlighting the Essential Components
When it comes to your chocolate Easter bars, the essential components are the chocolate, peanut butter, and crisp rice cereal. These ingredients form the delightful base for your treat, giving it that perfect blend of richness and crunch. The addition of mini marshmallows and pastel candies not only enhances flavor but also makes your bars visually scrumptious—perfect for sharing during the Easter festivities!
Did you know that using high-quality chocolate can really elevate your dessert? Opt for brands you trust or even check out a local artisan shop (for inspiration, see sources like Serious Eats) to find unique flavors. Your chocolate Easter bars will thank you!
With these ingredients ready, you’re set for a fun crafting session in your kitchen. Who’s ready to get started?
Preparing Chocolate Easter Bars
Making chocolate Easter bars is a delightful culinary adventure that celebrates the season and satisfies your sweet tooth. This simple yet scrumptious recipe is perfect for sharing with friends and family. Let’s roll up our sleeves and dive into the process of preparing these tasty treats!
Gather Your Ingredients
The first step in crafting your chocolate Easter bars is to assemble all the ingredients you’ll need. This helps streamline the process while ensuring you don’t forget anything. Here’s a checklist to make your life easier:
- Cocoa pops (about 2 cups)
- Dark chocolate (approximately 200 grams, chopped)
- Butter (100 grams, for richness)
- Eggs (4 large, preferably organic)
- Sugar (¾ cup, granulated)
- Vanilla extract (1 teaspoon, for flavor)
- Mini chocolate eggs (for that festive touch)
- A pinch of salt (to balance sweetness)
Having everything ready not only makes you feel like a pro but also keeps the cooking process fun and stress-free!
Blitz the Cocoa Pops
This next step is where things get exciting. Grab your food processor or blender and toss in those cocoa pops. You want to blitz them until they resemble fine crumbs. This doesn’t take long—around 30 seconds should do the trick!
The fine cocoa pop crumbs will serve as the base, adding both texture and cocoa flavor to your chocolate Easter bars. If you don’t have a food processor, you can also place them in a resealable plastic bag and crush them with a rolling pin—talk about a workout in the kitchen!
Whisk the Eggs and Combine
In a large mixing bowl, crack your eggs and whisk them together until they’re all frothy and well combined. This is a great opportunity to release some stress—give it all you’ve got! Once your eggs are frothy, add the sugar and vanilla extract, mixing until it’s light and creamy.
Next, melt the dark chocolate and butter together. You can do this in a microwave-safe bowl, heating it in short bursts (15-30 seconds), stirring in between. Once melted and smooth, mix the chocolate into your egg mixture. Then, gently fold in the blitzed cocoa pops until everything is combined into a luscious batter.
Add the Mini Eggs
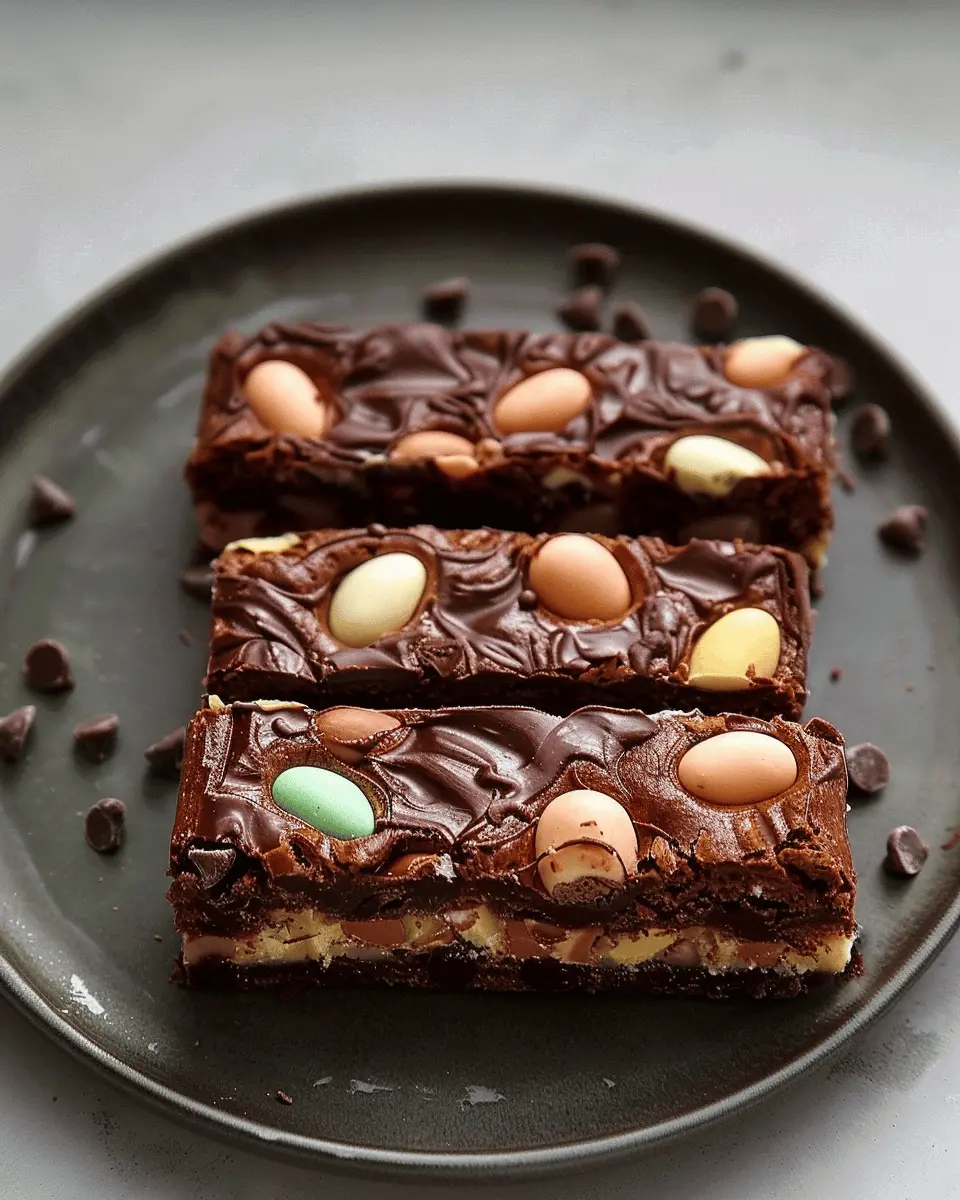
Now comes the fun part—incorporating those adorable mini chocolate eggs into your mixture. They’re the perfect way to enhance your chocolate Easter bars and are sure to bring joy to anyone who bites into them! Just fold them into your batter with care so they don’t break apart too much.
While you’re mixing, can you hear a faint call to get creative? Feel free to add in some nuts or dried fruits if you like a little extra crunch or flavor.
Air Fry and Cool Before Serving
It’s time to bake! Preheat your air fryer to about 160°C (320°F) and line the air fryer basket with parchment paper. Pour the batter into the basket, smoothing it out evenly. Air fry for about 15-20 minutes, or until the edges are set, and a toothpick inserted in the center comes out clean.
Once they’re done, let your chocolate Easter bars cool in the basket for 10-15 minutes. When they’ve cooled down to a warm temperature, remove them gently with the parchment paper. Allow them to cool completely on a wire rack.
And there you have it! Your homemade chocolate Easter bars are ready to be devoured. Whether you’re sharing them at a gathering or indulging in a quiet moment at home, these bars are sure to make your Easter celebrations even sweeter.
For more delicious seasonal recipes, check out expert sources like BBC Good Food or Taste of Home for more inspiration!
Happy baking!

Variations on Chocolate Easter Bars
When it comes to chocolate Easter bars, the sky’s the limit! These delightful treats can be easily customized to suit various dietary preferences and tastes. Here are some fun variations to consider:
Nutty Chocolate Easter Bars
If you’re a fan of crunch and a little extra protein, adding nuts to your chocolate Easter bars is an excellent option. Try incorporating chopped almonds, hazelnuts, or walnuts into your mixture. They not only enhance the flavor but also provide a satisfying textural contrast. For an extra twist, consider toasting your nuts beforehand—this step can really elevate the overall taste.
Vegan Chocolate Easter Bars
Going plant-based? No problem! Vegan chocolate Easter bars can be just as rich and delicious. Substitute regular chocolate with dairy-free chocolate options. A splash of coconut milk can help create that creamy texture you anticipate. Enhance the flavor with natural bits like dates, dried fruit, or even a hint of pure maple syrup for sweetness. Check out resources like The Vegan Society for inspiration on vegan substitutes.
Gluten-Free Options for Chocolate Easter Bars
For those with gluten sensitivities, crafting gluten-free chocolate Easter bars is simpler than you think! Use certified gluten-free oats or rice crisps as a base. You can also explore gluten-free flours, such as almond or coconut flour, to hold everything together. Many surprisingly delicious options are out there, so experimenting with unique textures can lead to a fantastic, allergy-friendly treat. Websites like Gluten-Free Living offer great tips and recipes to get you started.
These variations make it easy to share delicious chocolate Easter bars with everyone in your circle, regardless of dietary restrictions. Get creative, and happy baking!
Cooking Tips and Notes for Chocolate Easter Bars
Common Mistakes to Avoid
When making Chocolate Easter Bars, there are a few pitfalls you might encounter. One common mistake is overmixing the chocolate mixture, which can lead to a dense texture. Always mix until just combined for that perfect fudgy consistency. Another issue can be using subpar chocolate; opt for high-quality chocolate chips or bars, as they will make a significant difference in flavor. Lastly, not letting your bars cool completely before cutting can result in a messy situation—patience pays off!
Storage Tips for Freshness
To keep your Chocolate Easter Bars fresh, store them in an airtight container at room temperature for up to a week. If you want to extend their life, consider refrigerating them—just make sure to let them return to room temperature before enjoying for the best taste. For long-term storage, wrapping your bars in plastic wrap and placing them in the freezer can preserve their deliciousness for several months. Check out King Arthur Baking for more tips on storing baked goods!
By keeping these tips in mind, your Chocolate Easter Bars will be the talk of the gathering. Happy baking!
Serving suggestions for Chocolate Easter Bars
Perfect pairings with drinks
When it comes to the perfect drink to accompany your chocolate Easter bars, think beyond the usual suspects. A rich, creamy hot chocolate is an excellent choice, especially if you’re gearing up for a cozy gathering. For a refreshing twist, try a chilled coconut milk smoothie—the tropical notes pair wonderfully with the chocolate. If you’re seeking something a bit more adventurous, consider a vanilla-infused iced tea to lighten the sweetness just right.
Creative ways to serve or gift these bars
Your chocolate Easter bars aren’t just a dessert; they can also be a delightful gift! Imagine wrapping them in vibrant colored foil and tying them with a ribbon for a charming touch. Alternatively, you could create a personalized gift basket: include the bars alongside some fresh fruit like strawberries or bananas, and even a few homemade cookies from your favorite recipe. If you’re hosting a gathering, consider cutting your bars into small squares and presenting them on a decorative platter as a sweet treat to share.
For more festive ideas and inspiration, you might explore passages on food gifting at The Kitchn. These tips can help elevate your chocolate experience!
Time breakdown for Chocolate Easter Bars
Preparation time
Preparing these delightful chocolate easter bars takes about 20 minutes. Gathering your ingredients and tools beforehand will make your cooking experience smooth and enjoyable! Think of this time as your creative moment; put on some music, and let the good vibes flow as you melt that chocolate and mix in those festive goodies.
Cooking time
The actual cooking time is relatively quick, around 25 minutes. You’ll want to keep an eye on your bars while they bake to ensure they achieve that perfect gooey texture.
Total time
All in all, you’re looking at a total of 45 minutes from start to finish. Trust me, the aroma wafting through your kitchen will be more than worth it! If you’re looking to impress your friends or simply treat yourself, these chocolate easter bars will definitely hit the spot.
For more ideas on delectable desserts, check out resources from The Spruce Eats or Serious Eats to expand your baking repertoire!
Happy baking!
Nutritional Facts for Chocolate Easter Bars
Calories per bar
Each Chocolate Easter Bar contains approximately 150 calories, making it a delightful treat without going overboard.
Protein content
These bars are not just about indulgence; they also pack in around 3 grams of protein. This small boost can help keep you feeling satisfied during those busy afternoons.
Key nutrients to note
Let’s talk about some vital nutrients in these tasty bars:
- Dietary Fiber: With about 2 grams per bar, your digestion will thank you.
- Calcium: Essential for maintaining strong bones, these bars offer a small helping of this critical mineral.
- Antioxidants: The dark chocolate used is rich in antioxidants, adding heart health benefits to your guilty pleasure.
For more information on nutritional benefits, check out sources from Healthline and NutritionData. Enjoy your Chocolate Easter Bars while nourishing your body!
FAQs about Chocolate Easter Bars
When diving into the delightfully sweet world of Chocolate Easter Bars, it’s natural to have a few questions. Let’s clear up some common queries to help you create the perfect treat!
Can I substitute ingredients in this recipe?
Absolutely! One of the joys of making your own Chocolate Easter Bars is customizing them to your taste. Here are some ideas for substitutions:
- Chocolate: If you prefer dark or white chocolate, feel free to swap the milk chocolate for your favorite variety. Just adjust the sweetness as needed.
- Sweeteners: For a healthier twist, consider using honey or maple syrup instead of refined sugar. Just remember that these can alter the texture slightly.
- Add-ins: Nuts, dried fruits, or even different types of candies can give your bars a unique flair. Get creative!
How long do these bars last?
When stored in an airtight container, Chocolate Easter Bars can last up to two weeks at room temperature. If you’ve made a big batch, they could even last longer in the fridge, possibly up to a month. Just ensure they’re properly sealed to maintain freshness!
Can I freeze Chocolate Easter Bars?
Definitely! Freezing your Chocolate Easter Bars is a great way to extend their shelf life. Wrap them tightly in plastic wrap or store them in a freezer-safe container. They can stay tasty in the freezer for about 3 months. When you’re ready to enjoy them, simply let them thaw in the fridge or at room temperature.
If you have more questions, feel free to explore expert recipes on sites like Serious Eats or Food52 to see how other bakers are remixing similar treats! Happy baking!
Conclusion on Chocolate Easter Bars
Recap on the ease and enjoyment of the recipe
Making chocolate Easter bars is not only simple but also a delightful experience that brings boost of joy. With just a few key ingredients and minimal prep time, you can create a sweet treat that’s perfect for celebrating the holiday. The beauty of this recipe lies in its versatility; you can customize it to fit your personal taste or dietary preferences.
Encouragement to try making them at home
So, why not give it a shot? Baking these chocolate Easter bars is a great way to bond with family or friends. Imagine the satisfaction of pulling a gooey, chocolatey treat from the oven and sharing it with loved ones. Plus, homemade treats can be healthier than store-bought options. If you’re looking for a fun yet easy recipe that guarantees smiles, look no further than these delightful bars. Happy baking!
For more baking tips, check out resources like King Arthur Baking or FoodNetwork.
PrintChocolate Easter Bars: Indulgent Treats to Delight Your Family
Delicious and festive Chocolate Easter Bars that are perfect for celebrating the holiday with family and friends.
- Prep Time: 15 minutes
- Cook Time: 20 minutes
- Total Time: 35 minutes
- Yield: 12 bars 1x
- Category: Dessert
- Method: Baking
- Cuisine: American
- Diet: Vegetarian
Ingredients
- 1 cup chocolate chips
- 1 cup marshmallows
- 1/2 cup butter
- 1 cup graham cracker crumbs
- 1/2 cup chopped nuts
Instructions
- Preheat your oven to 350°F (175°C).
- In a saucepan, melt the butter and chocolate chips together over low heat.
- Once melted, remove from heat and stir in the graham cracker crumbs and chopped nuts.
- Fold in the marshmallows until well mixed.
- Press the mixture into a greased baking dish.
- Bake for 15-20 minutes or until golden brown.
- Let cool before cutting into bars.
Notes
- For extra flavor, add a teaspoon of vanilla extract.
- Use dark chocolate chips for a richer taste.
Nutrition
- Serving Size: 1 bar
- Calories: 150
- Sugar: 10g
- Sodium: 85mg
- Fat: 8g
- Saturated Fat: 5g
- Unsaturated Fat: 3g
- Trans Fat: 0g
- Carbohydrates: 18g
- Fiber: 1g
- Protein: 2g
- Cholesterol: 15mg
Keywords: Chocolate Easter Bars, Easter recipes, chocolate treats